How to Organize Food Storage Containers and Lids in a Small Kitchen
Food storage containers have a special talent for turning one small cabinet into a daily scavenger hunt. Bases nest until one odd shape breaks the stack. Lids look interchangeable until they are not. A tidy setup can also fail the moment half the collection is in the refrigerator, the dishwasher, or a lunch bag.
If you are trying to figure out how to organize food storage containers in a small kitchen, the goal is not to make every piece look uniform. It is to build a bounded system that works through the full cycle: retrieve a container, use it, wash and dry it, then return it without rebuilding the whole zone.
OrganizeSmartly’s Container System Fit method uses this sequence:
ROLL-CALL → PAIR → HOME + FORM → CAP → TEST → ROUTE / REMEDY
The sequence matters. Count the real inventory before calling anything an orphan. Confirm which bases and lids actually belong together. Choose the storage home and storage form as one decision. Set a capacity the space can genuinely absorb. Test the system in normal use. Only then decide whether the answer is a different route, a smaller collection, a targeted organizer, or nothing new at all.
Quick Navigation
Affiliate disclosure: This guide contains affiliate links. If you purchase through one of our links, OrganizeSmartly may earn a commission at no additional cost to you. We recommend products based on problem-solution fit, dimensions, and practical usefulness. Read the disclosure.
Why Food Storage Containers Get Messy So Fast
Two Pieces, Different Storage Behavior
A food container is one useful object when it is in use, but it becomes two storage objects when it is empty: the base and the lid.
Bases may nest or stack. Lids usually need a different orientation. Some collections have several shapes or product lines that look close enough to create confusion but do not behave as one storage family. That is why a cabinet can look organized and still waste time every time you need one complete set.
The problem is not just how many pieces you own. It is also how many different base-and-lid interfaces you have to recognize.
If two lids look nearly identical but belong to different bases, that is a matching problem even when everything is technically visible.
The System Changes When Pieces Leave and Return
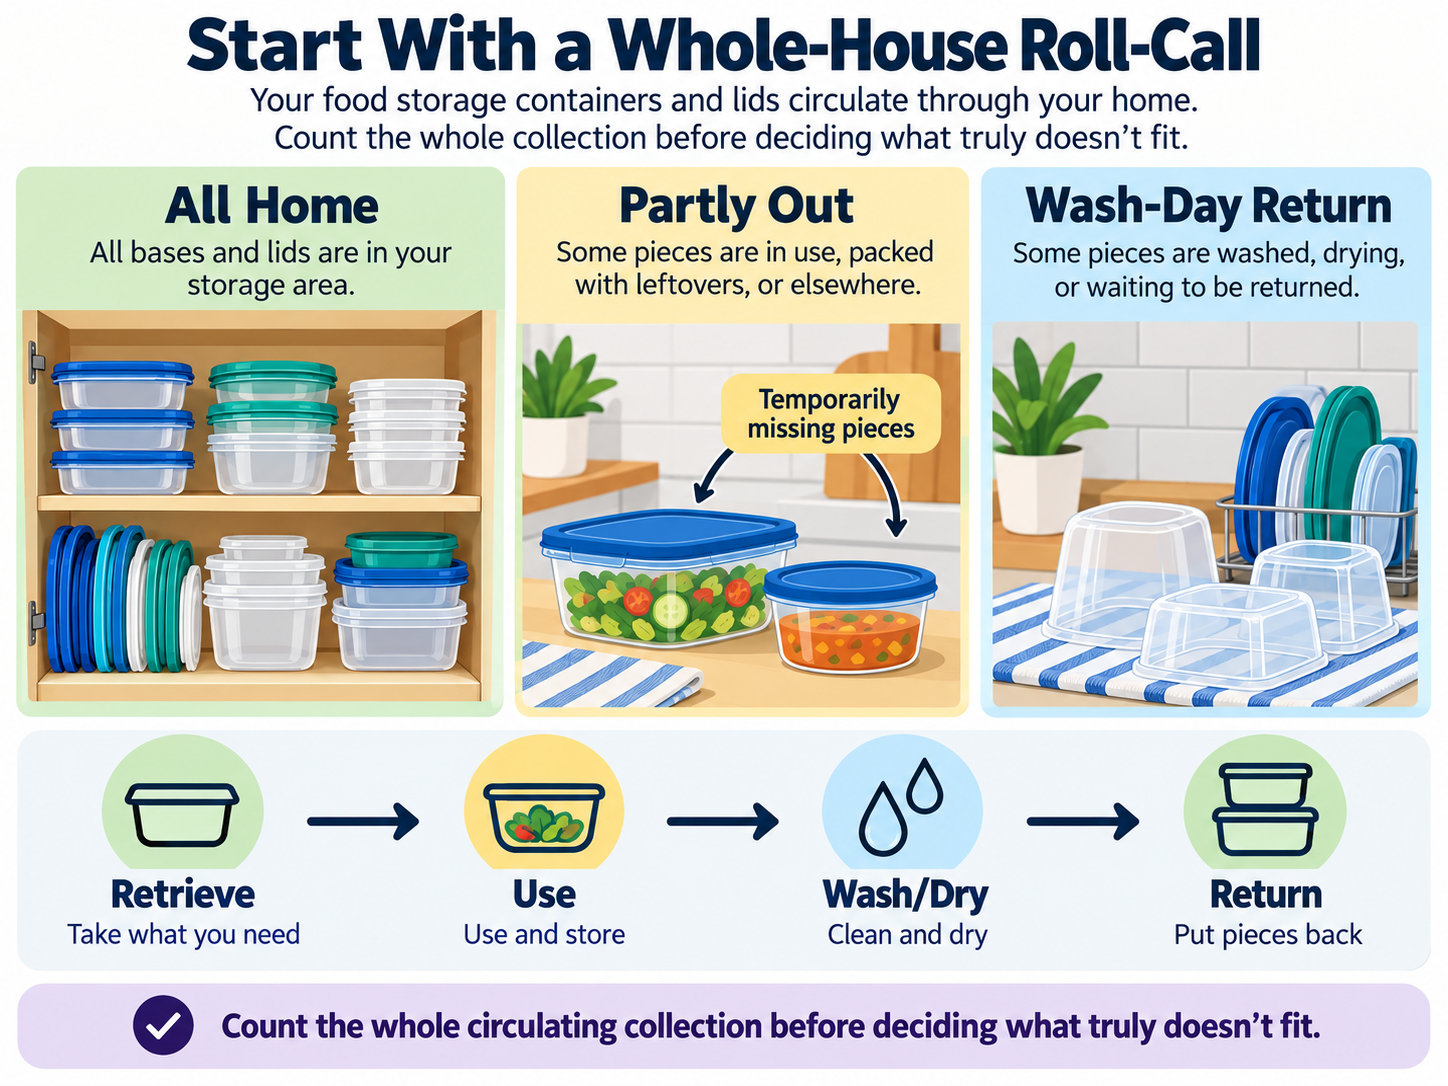
A container system rarely stays in its staged, all-home condition. Pieces circulate.
At different points in the week, some may be holding leftovers, sitting in the dishwasher, drying beside the sink, or traveling in a lunch bag. That creates three useful states to plan for:
All home: Every intended piece has returned. This is the maximum-capacity state.
Partly out: Commonly used pieces are away from the storage zone. This tests whether the remaining stacks and lid groups stay stable and understandable.
Wash-day return: Several pieces come back together after drying. This tests whether the return path is obvious or whether the system only works when you carefully rebuild it.
A useful setup should survive all three.
Step 0: Run a Whole-House Roll-Call
Gather Every Base and Lid Before Calling Anything an Orphan
Start by bringing together the collection you actually use. Check the cabinet or drawer, but also account for pieces temporarily in circulation.
Look in the refrigerator and freezer for containers currently holding food. Check the dishwasher and drying area. If food containers regularly travel in lunch bags, include those too.
This does not mean emptying food out of containers just to count them. It means delaying the “orphan” verdict until you know whether the missing partner is simply somewhere else.
Create three temporary groups:
- confirmed complete pairs or known lid families;
- pieces whose partner may still be in circulation;
- pieces that appear incomplete after the roll-call.
That small delay prevents a common organizing mistake: editing the collection before you have actually seen the collection.
Separate Condition Questions From Organization Questions
Organization and product-condition decisions are not the same problem.
If a container is damaged, warped, heavily worn, or being used in a way you are unsure about, check the exact product guidance rather than inventing a universal replacement rule. Food-contact uses can involve different conditions, and suitability for refrigeration, freezing, reheating, microwave use, or other conditions should not be inferred from material or appearance alone.
FDA guidance distinguishes different conditions of use for food-contact substances, and USDA microwave guidance directs consumers to use containers or cookware intended or labeled for microwave use.
For this organizing process, keep the question narrow: Is this a piece you have decided to keep and use? If yes, include it in the system. If its condition or intended use is uncertain, resolve that separately before treating it as normal storage inventory.
Step 1: Pair the Collection Before You Organize It
Build Usable Base-and-Lid Pairs
Before buying dividers or filing lids into neat rows, identify the relationships that make the collection usable.
Pair each base with the lid or lid family you know belongs to it. If you have manufacturer documentation showing that one lid is designed to fit several bases within a specific product line, treat that as one verified lid family.
Do not assume that pieces are interchangeable because they share a brand, color, shape, or approximate size. A same-brand collection can still contain multiple generations or lines with different interfaces.
Rubbermaid, for example, documents shared-lid compatibility within its EasyFindLids system. That is useful evidence for that named system, not proof that every Rubbermaid lid fits every Rubbermaid base.
The organizing goal is simple: know which relationships are real before you design storage around them.
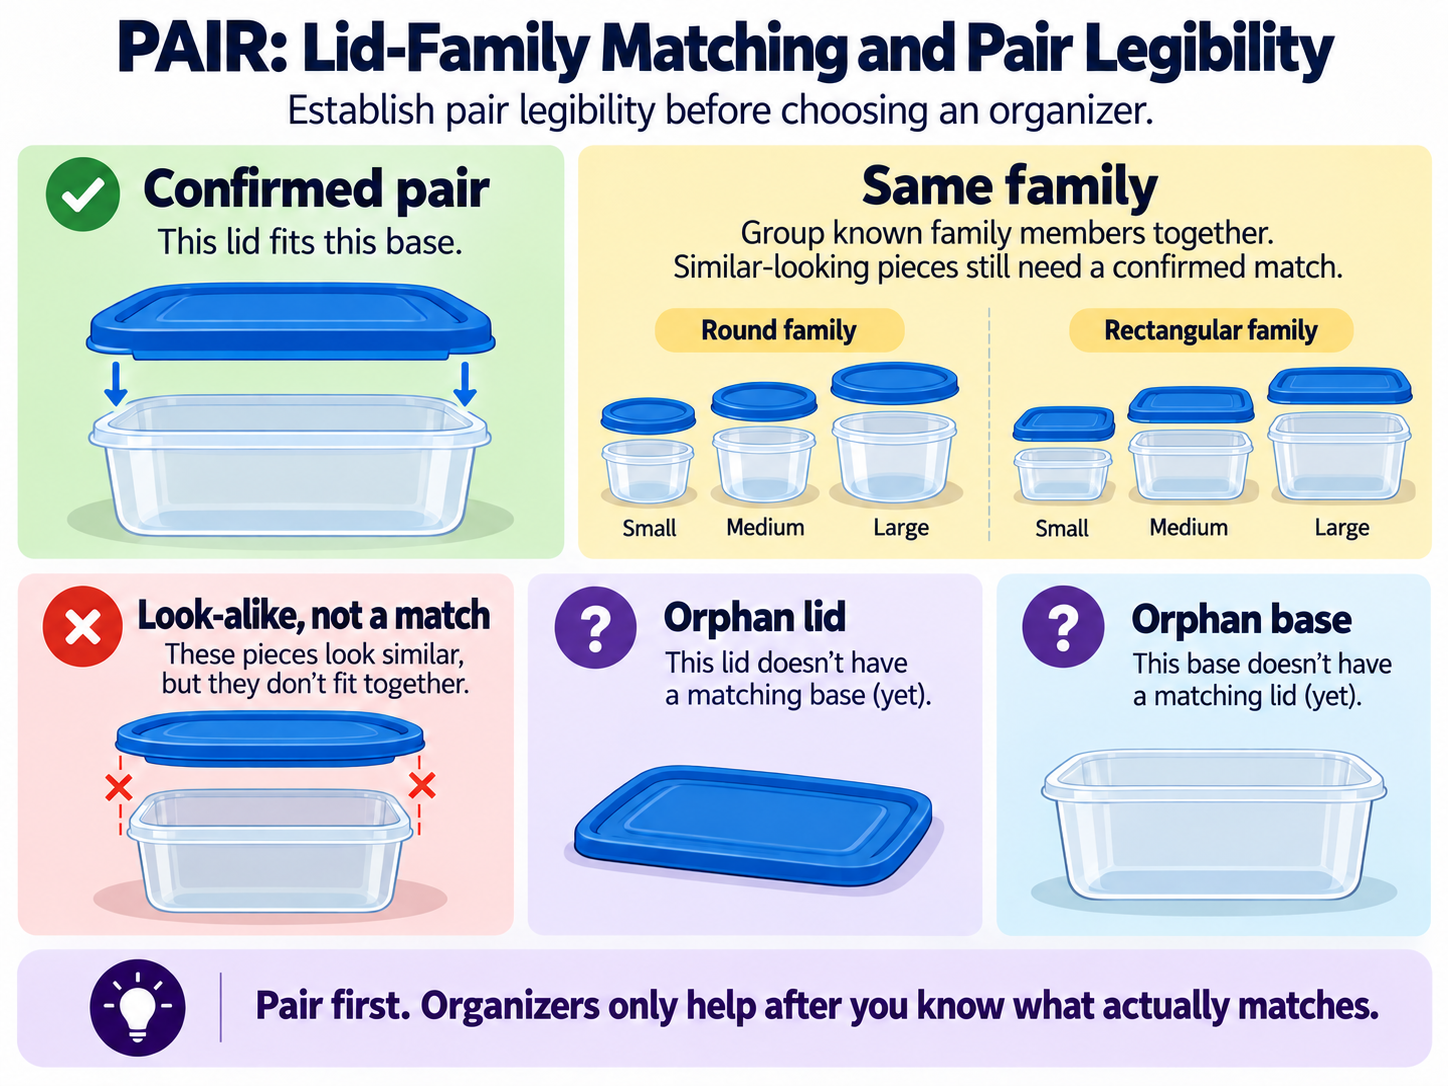
Map Lid Families and Near-Matches
Next, look for matching friction.
A collection may have only a modest number of lids but still be frustrating if several of them look almost identical. OrganizeSmartly calls this pair legibility: how easily you can tell which lid belongs to which base.
Pair legibility is a usability check, not a test of airtightness, leakproofness, or food safety.
Ask:
- Can I recognize the correct lid without trying several?
- Do two lid families look similar enough that I repeatedly confuse them?
- Are sizes or shapes visually distinct enough to group naturally?
- Would storing one confusing family separately make matching easier?
Sometimes the best improvement is not a new organizer. It is simply reducing the number of visually ambiguous interfaces you have to scan.
Separate Everyday Pairs From Occasional Complete Sets
Not every complete set needs the same access priority.
Keep the containers you reach for constantly in the most convenient part of the primary zone. Large party containers, seasonal sizes, or specialty shapes can sit behind them or move to limited secondary storage if the primary zone cannot hold everything without failing.
Do not use a fixed count. The useful number depends on what your household actually uses and what the chosen storage zone can accept without becoming unstable or difficult to reset.
Step 2: Choose the Home and Storage Form Together
A storage method that looks efficient on its own can fail inside the cabinet or drawer you actually have. Choose the home and form together.
The three practical forms are nested bases with separate lids, lids-on storage, and a hybrid.
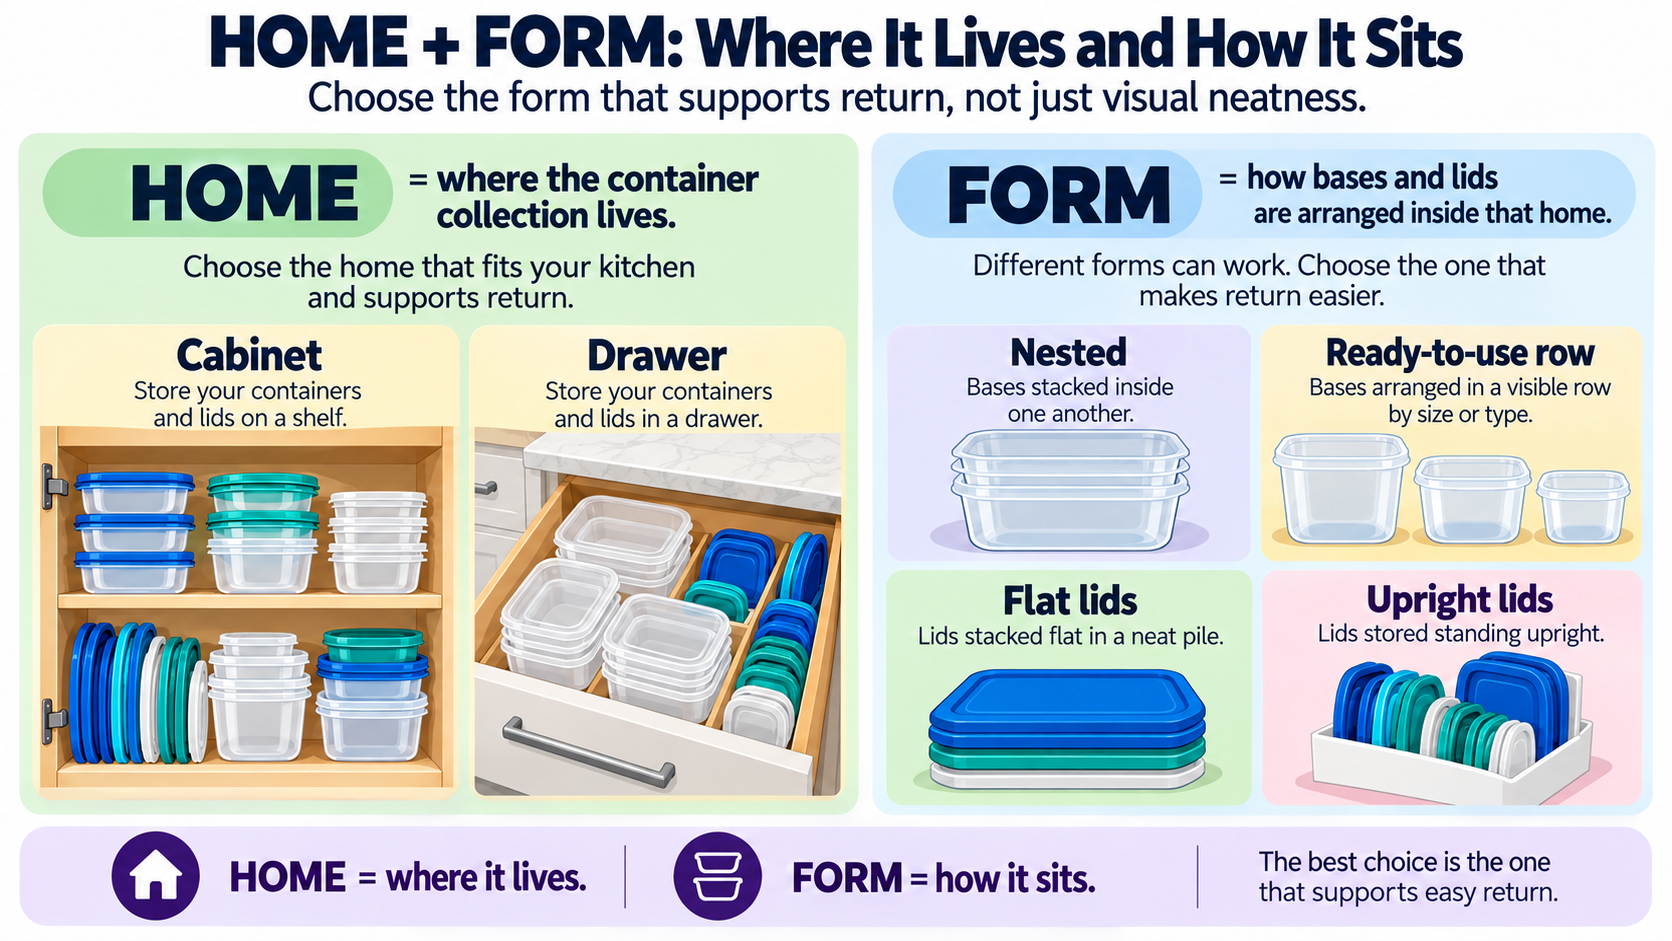
Nested Bases + Separate Lids
This works best when the bases genuinely nest into predictable families and you have a clear, stable place for the corresponding lids.
Potential advantages:
- smaller base footprint;
- efficient use of vertical nesting;
- easier grouping when sizes are visually distinct.
Potential tradeoffs:
- matching happens during retrieval;
- the base you want may be buried;
- loose upright lids can slump or migrate without enough support;
- a partially depleted nest may behave differently from a full stack.
If you use this form, do not treat “store lids vertically” as an automatic rule. Upright storage is useful only when the lid envelope fits the zone and the lids stay visible and stable.
Lids-On Storage
Storing containers as complete assembled sets moves the matching step to the return stage.
Potential advantages:
- the pair is immediately obvious;
- retrieval is simple;
- visually similar lid families create less search friction.
Potential tradeoffs:
- each set takes more space;
- assembled stacks can become bulky;
- the storage zone must accept the full assembled envelope;
- pieces should be fully dry before they are closed and returned.
This can be a perfectly rational choice in a small kitchen when matching friction is the bigger problem and the zone has enough footprint.
Hybrid Storage
A hybrid uses different rules for clearly different families.
For example, a compact everyday nesting family might use nested bases with one nearby lid lane, while a few bulky specialty pieces stay assembled because their lids are unique and easy to lose.
The risk is rule complexity. A hybrid works only when the split is obvious enough that you do not have to remember a miniature filing system after every wash.
Use the Container Demand Sheet Before Committing
Before you commit to a cabinet, drawer, pull-out, or organizer, describe what the collection is asking the space to hold.
This is the Container Demand Sheet. It focuses on the containers themselves rather than reteaching general cabinet or drawer measurement.
Record:
- Base-family footprint. How much floor area does each nested, stacked, or assembled family require in the form you plan to use?
- Stack height. What is the tallest normal stack? When common pieces are removed, does the remaining stack stay stable?
- Lid envelope. What is the largest relevant lid dimension in the orientation you plan to use? If lids stand on edge, include that upright height.
- Protrusions. Note latches, handles, vents, rims, or overhangs that could catch on another piece or enter the closing path.
- Handling note. Flag any stack or individual piece that is awkward or heavy enough that you do not want to lift it from an inconvenient position.
Then compare that demand with the usable space in the candidate zone. You do not need a universal cabinet dimension. You need to know whether your actual collection, in its intended form, fits and can still be reached and returned normally.
If the broader problem is the cabinet itself, including shelf use or general cabinet zoning, this guide to organizing kitchen cabinets in a small kitchen covers that infrastructure in more depth.
If you are considering a drawer and discover that the problem is really drawer height, slides, closure, or general divider mechanics, use the kitchen drawer organization guide for that broader problem instead.
Step 3: Set a Capacity Limit Without Arbitrary Numbers
Design for the All-Home State
A storage zone should be able to accept the collection it is supposed to own when the pieces come back.
That sounds obvious, but a system can look spacious while several containers are conveniently missing. Two everyday containers may be in the refrigerator and three lids drying beside the sink; when everything returns, the overflow begins.
Plan for the all-home state first. If the primary zone cannot accept its intended collection without squeezing, unstable stacks, blocked closure, or an improvised second pile, the system is already telling you something.
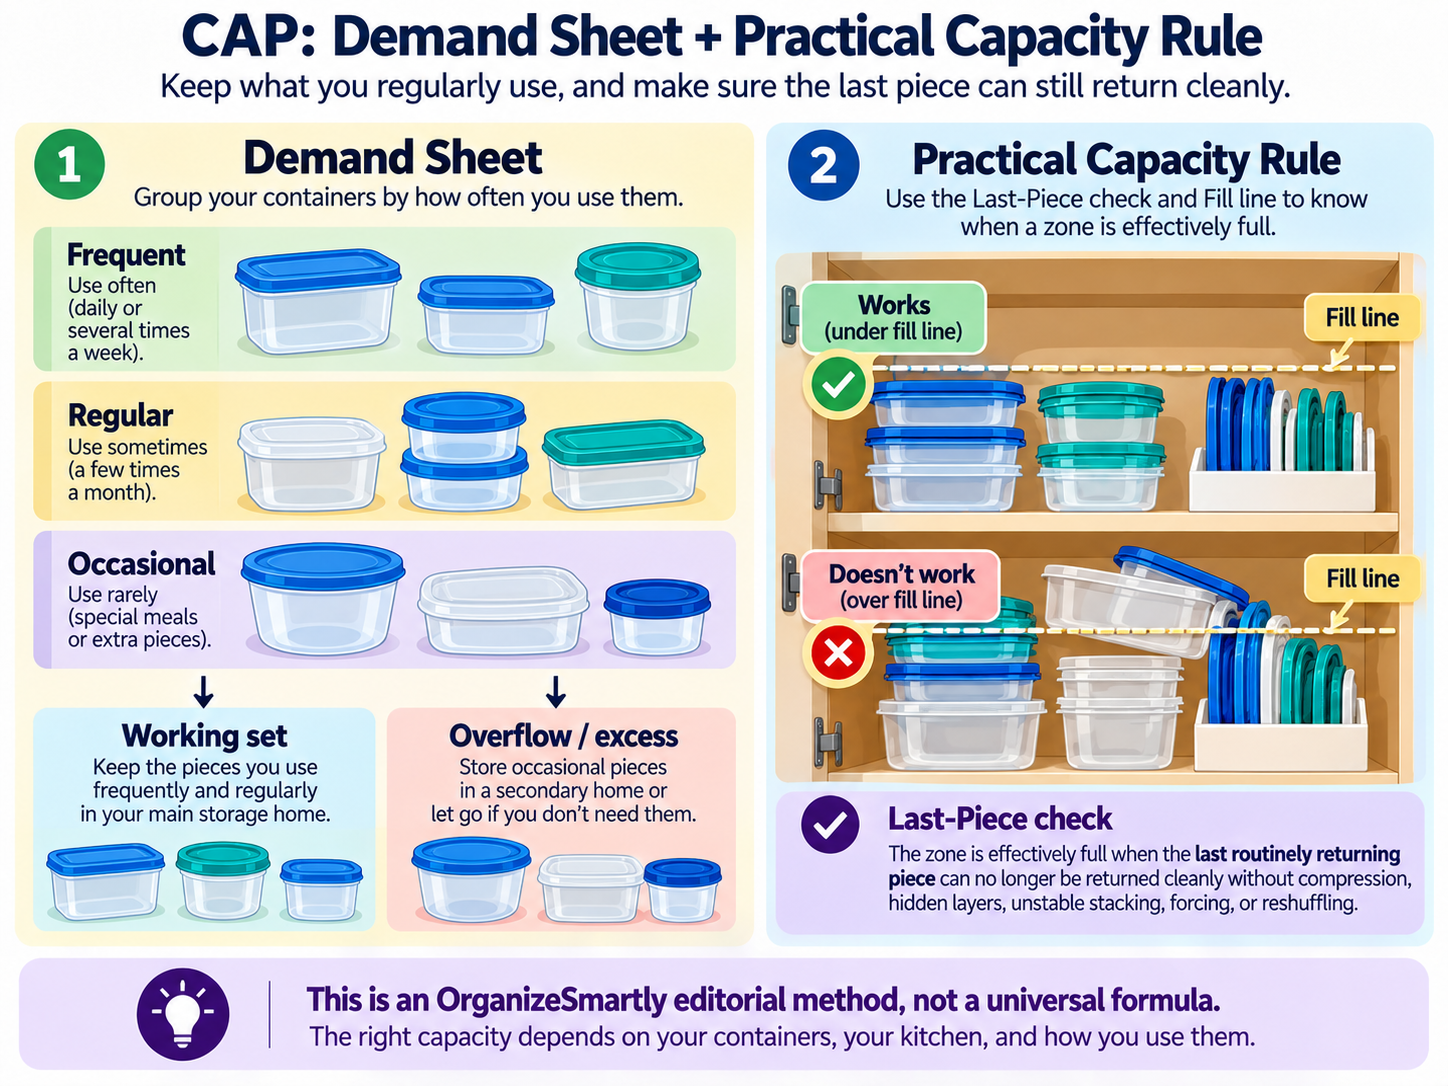
Use the Last-Piece / Fill-Line Test
OrganizeSmartly uses a simple editorial rule instead of a fixed percentage or universal container count.
Return the final normal piece to its intended home.
If returning that last piece requires you to squeeze it into a gap, move unrelated pieces, create an unplanned second location, destabilize a stack, or compromise normal closure, the zone is at or beyond its practical fill line.
This is not a scientific capacity formula. It is a behavioral test for whether the storage system still functions at full normal demand.
The advantage is that it adapts to different cabinets, drawers, container shapes, and organizer footprints. It also forces you to count the organizer itself as something that consumes space.
What to Do When the Collection Exceeds the Zone
When the last-piece test fails, work through the problem in this order:
- Recheck the pairs. Make sure you are not using space for pieces that still have no usable partner.
- Reduce unnecessary redundancy. Keep the actual roles your household uses, rather than trimming to an arbitrary number.
- Change the storage form. A family may fit better nested, assembled, or separated from another family.
- Route a small, obvious specialty group elsewhere. Secondary storage should be intentional and easy to remember, not a second mystery pile.
- Try a different primary home if one genuinely fits the collection better.
- Consider an organizer only when a specific structural failure remains and the organizer fits after its own walls, frame, and clearance are counted.
- If none of those solves the overcapacity, reduce the collection rather than endlessly adding hardware around it.
If packaged food or backstock is competing with empty-container storage for the same limited cabinet, the larger problem is pantry function. This guide to organizing a small kitchen without a pantry can help you decide where that food inventory should live.
Step 4: Test the System Through a Real Use Cycle
A system is not finished because it looks tidy once. Test whether it survives retrieval, use, washing, drying, and return.
The following Cycle Test is OrganizeSmartly editorial methodology, not a scientific test. Its job is simply to expose practical failure before you invest in more hardware.
Grab Test
Retrieve one frequent-use complete pair.
Fail if you have to move unrelated pieces, search a second location, or repeatedly guess among visually similar lids.
A failure here usually points to pair legibility, buried bases, excessive depth, or a split system that is too complicated.
Half-Out Stability Test
Remove several commonly used pieces to simulate normal life.
Fail if the remaining stacks lean or collapse, lids slump into neighboring lanes, or the return locations become ambiguous once gaps appear.
This matters because a perfectly packed full cabinet may be relying on every piece to hold every other piece upright.
Normal-Closure Test
Open and close the cabinet or drawer normally.
Fail if a lid, latch, stack, or organizer shifts into the closing path, catches, or prevents normal closure.
Do not perform a delicate test that succeeds only because you are carefully protecting the arrangement. The system should survive the way you actually use the kitchen.
If the real problem is general cabinet or drawer infrastructure rather than the container collection, solve that broader issue separately instead of forcing container organizers to compensate for it.
Wash-Day Return Test
After a realistic batch is fully dry, return the pieces.
Fail if you have to search for several destinations, rebuild an untouched stack, or create a temporary pile because the intended home cannot absorb the returning pieces.
This is where an attractive system can reveal its hidden cost: the setup is easy to understand in a photo, but too precise to maintain after washing.
Step 5: Route or Remedy the Failure
Once you know what failed, make the smallest change that fixes that specific failure.
Route means where a complete family legitimately lives after testing.
Remedy means the smallest change that solves a named problem.
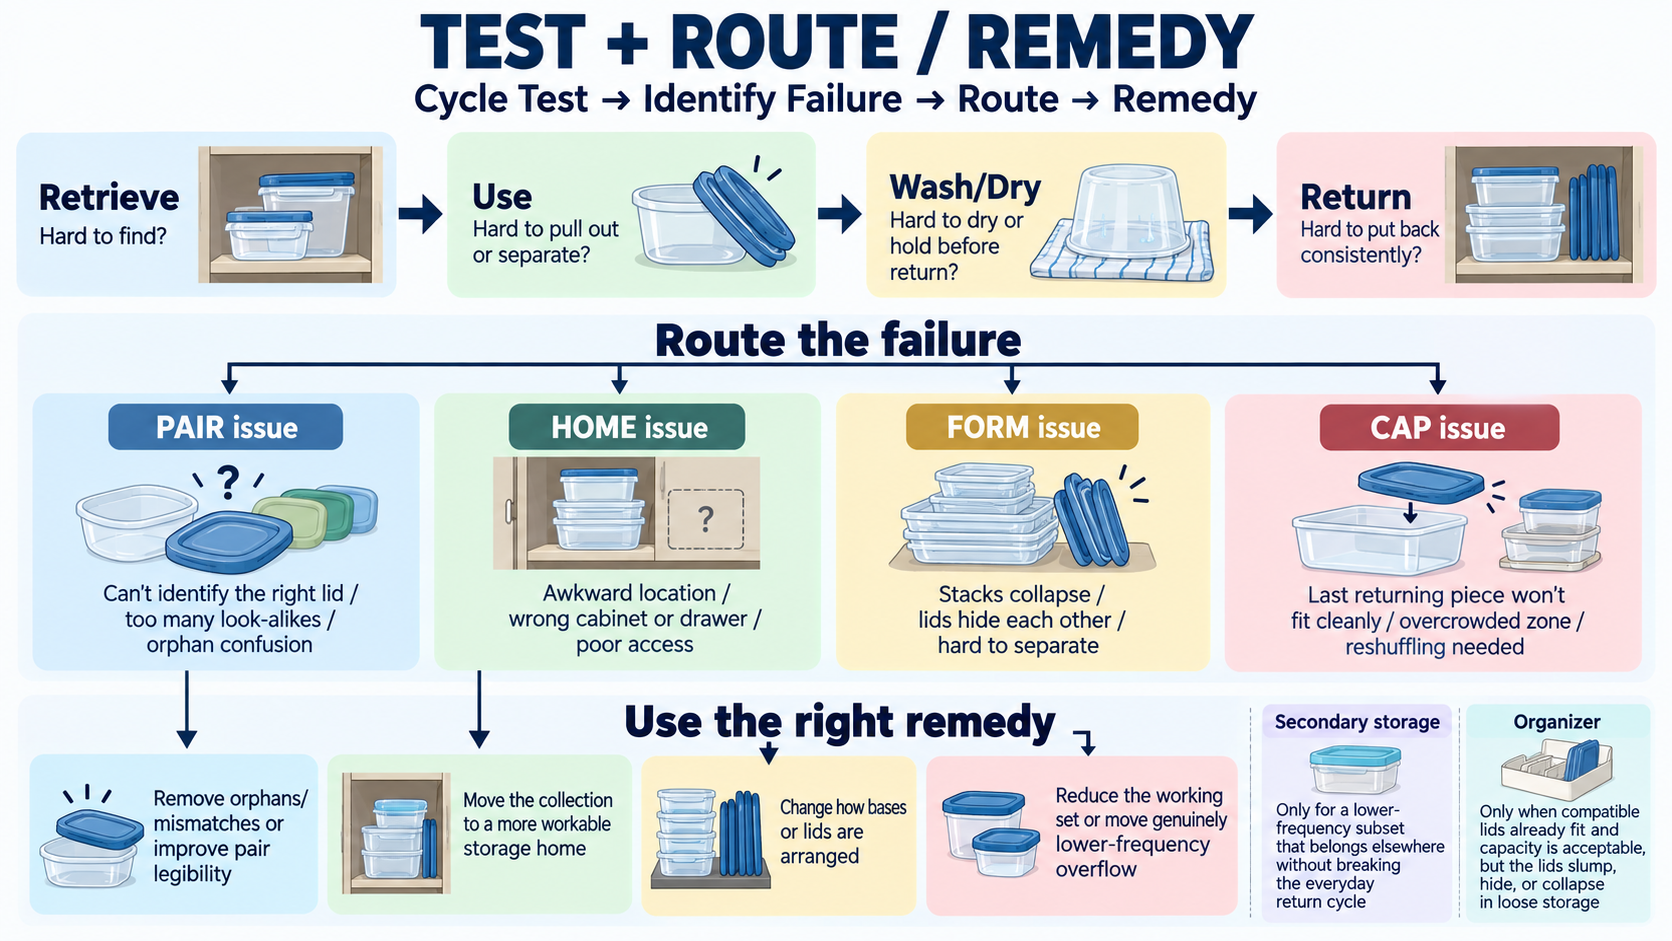
When a Different Storage Route Makes More Sense
A drawer, cabinet shelf, pull-out, or limited secondary location can all be valid routes. The right choice depends on the Container Demand Sheet and the failure you are trying to solve.
A deep drawer may make stacks visible from above, but only if the container heights, lid envelope, and normal closing path work in that drawer.
A cabinet shelf may be the simplest home when families can be reached without unloading unrelated stacks.
A pull-out or pull-forward bin can help with inaccessible depth, but only if the unit itself fits the usable opening and can travel normally.
Secondary storage is reasonable for a small number of obvious occasional sets. It becomes a problem when everyday pieces are split across multiple places and every retrieval turns into a search.
When an Organizer Actually Helps
An organizer is useful when it fixes a structural failure that still exists after pairing, form, and capacity decisions.
Examples:
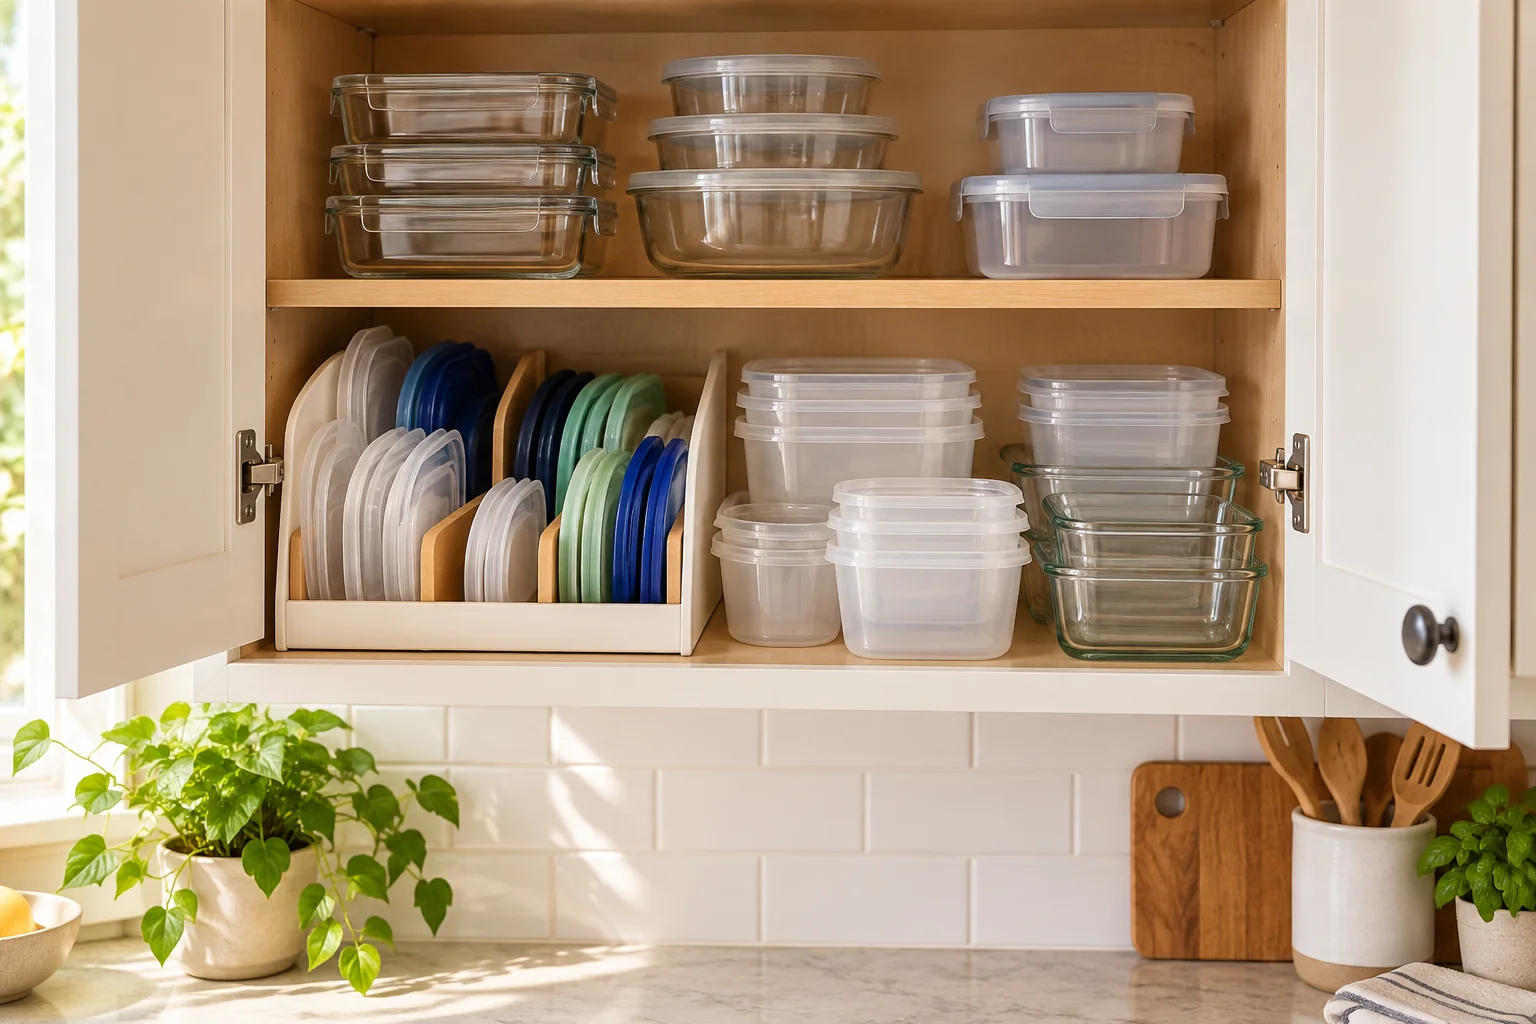
- Lids are compatible and the collection fits, but they slump sideways and hide one another. A correctly sized lid divider may solve the stability and visibility failure.
Measure First
Usable cabinet or drawer width, depth, and height; opening/face-frame/hinge clearance; largest confirmed lid width, height, and thickness; and enough operating room to load and remove lids without bending or forcing them.
Best For
Already-compatible lid families that fit the chosen home but slump, overlap, hide one another, or become awkward to retrieve and return when stored loose.
Skip If
PAIR is unresolved; the collection already exceeds the zone’s capacity; the organizer footprint would displace needed container-base storage; lids work more reliably flat or attached to bases; the cabinet or drawer cannot close normally; or a no-purchase arrangement already passes the Cycle Test.
Space Gain
Does not create storage volume. It converts part of the existing cabinet or drawer footprint into separated upright lid storage and can make that footprint easier to scan and use.
Effort
Low-to-moderate setup. Ongoing effort stays low only when lids can return to their assigned sections without squeezing, reshuffling, or forcing the dividers.
Renter-Safe
Favorable from an attachment standpoint because the organizer is freestanding and does not require permanent cabinet fasteners. Fit still has to be verified before purchase.
Accessibility Gain
Can improve visual scanning and one-at-a-time lid retrieval when placed at a comfortable reach. It does not fix a storage home that is too high, too deep, or otherwise difficult for the user to access.
Kitchen
YouCopia StoraLid Food Container Lid Organizer, Large Classic Edition
Five adjustable dividers let already-compatible lid families stand in separated groups, which can reduce slumping, overlap, and hidden lids when loose lid storage is the diagnosed failure. This organizer improves stability and visibility only; it does not determine lid compatibility, create storage capacity, or make an oversized collection fit.
Check on Amazon (opens in a new tab)- One clearly defined container family disappears at the back of a deep cabinet. A low pull-forward bin may improve retrieval if it does not consume too much usable volume.
- A suitable deep drawer allows the collection to fit, but containers drift laterally. A container-specific peg or divider system may help after the drawer itself has already proven suitable.
Measure the organizer as part of the system. Its walls, frame, handles, dividers, mounting hardware, and travel can reduce usable capacity. A product that organizes eight lids beautifully but makes the ninth normal lid homeless has not increased the system’s capacity.
When Buying Nothing Is the Better Answer
If the edited collection fits, pairs are easy to recognize, the zone closes normally, and the system passes the Cycle Test, buying nothing is a successful result.
The goal is not to maximize the number of organizing products inside the cabinet. It is to reduce search, instability, overflow, and reset friction.
Keep Lids Visible Without Making Them the Whole Strategy
Lids deserve their own logic because they behave differently from bases, but lid storage is only one part of the system.
Upright filing can work when:
- lids fit the available height;
- the row remains stable when several lids are removed;
- sizes or families remain visible;
- the divider or bin does not consume too much footprint.
Flat stacking can work when:
- the lid family is small;
- the desired lid is not repeatedly buried;
- the stack stays inside the available envelope.
Attached or lids-on storage can work when:
- the assembled sets fit;
- matching friction is the main failure;
- the larger space envelope is acceptable.
Do not use a lid organizer to solve a compatibility problem. A divider can hold incompatible lids more neatly, but it cannot make them interchangeable.
And do not use lid hardware to hide an overcapacity problem. If every divider slot is packed tightly and returning one lid forces another out, the failure is capacity, not a lack of dividers.
Keep the System Stable as the Collection Changes
Container collections change slowly and then all at once. A new size joins the collection. A favorite piece breaks. A replacement lid comes from a different line. One family grows while another barely gets used.
You do not need a monthly reorganization ritual. Instead, use a simple admission check when the collection changes:
Pair: Does the new piece have a known usable relationship?
Home + Form: Where will it live, and in what storage form?
Cap: Can the intended zone accept it in the all-home state without crossing the fill line?
Test: Does the changed system still pass retrieval, partial-depletion, closure, and return?
If the answer is no, route or remedy the named failure rather than quietly starting a second pile.
Rerun the full roll-call when matching friction builds up again or you are no longer sure which pieces belong together.
Frequently Asked Questions
Is it better to store food containers with the lids on or off?
Neither method is universally better. Nested bases with separate lids usually use a smaller base footprint, but they move matching work to retrieval. Lids-on storage makes each pair obvious, but it uses a larger storage envelope. A hybrid can work when the split between families is easy to understand. Choose the method that fits your collection, storage zone, and return habits, then test it in the all-home and wash-day states.
What is the best way to organize Tupperware lids?
“Tupperware” is a specific brand, although people often use the word when searching for reusable food-container organization. For any brand, start by confirming which lids belong to which bases. Upright lid dividers can help when compatible lids are hard to see or keep upright, but they do not fix incompatible pieces or an oversized collection. Use a lid organizer only when lid stability or visibility is the diagnosed failure.
Should food storage containers go in a cabinet or drawer?
Either can work. Compare the collection’s footprint, stack height, lid envelope, protrusions, and handling needs with the usable zone. Choose the route where the pieces fit, stay reachable, and allow normal closure. If the problem turns into general cabinet infrastructure or general drawer mechanics, solve that broader storage problem separately.
How do you organize a mixed collection of food storage containers?
Start with a whole-house roll-call, then pair the collection and identify lid families and near-matches. Choose the storage form family by family instead of forcing every piece into one rule. Set capacity with the all-home and last-piece tests, then run the Cycle Test. Mixed collections can work well when the rules are visible and the number of confusing interfaces stays manageable.
How should glass food storage containers be organized?
Focus on storage fit and handling rather than making a glass-versus-plastic safety judgment. Keep heavy or awkward stacks in a position you can handle comfortably, avoid building a retrieval system that requires lifting a large stack every time, and use the exact manufacturer guidance for product-specific microwave, freezer, dishwasher, oven, lid-compatibility, or care claims.
Do I need a food-storage-container organizer?
Not necessarily. First identify the failure. If the collection already fits, stays stable, closes normally, and returns easily after washing, an organizer may add cost and consume useful space without solving anything. Consider one only when a specific problem remains, such as unstable lids or inaccessible depth, and only after measuring the organizer’s own footprint and fit.
A small kitchen does not need a perfect container cabinet. It needs a container system that comes back together after ordinary life happens.
Do the roll-call. Pair what actually works. Choose the home and form together. Set the fill line. Test the real cycle. Then fix only the failure that remains.