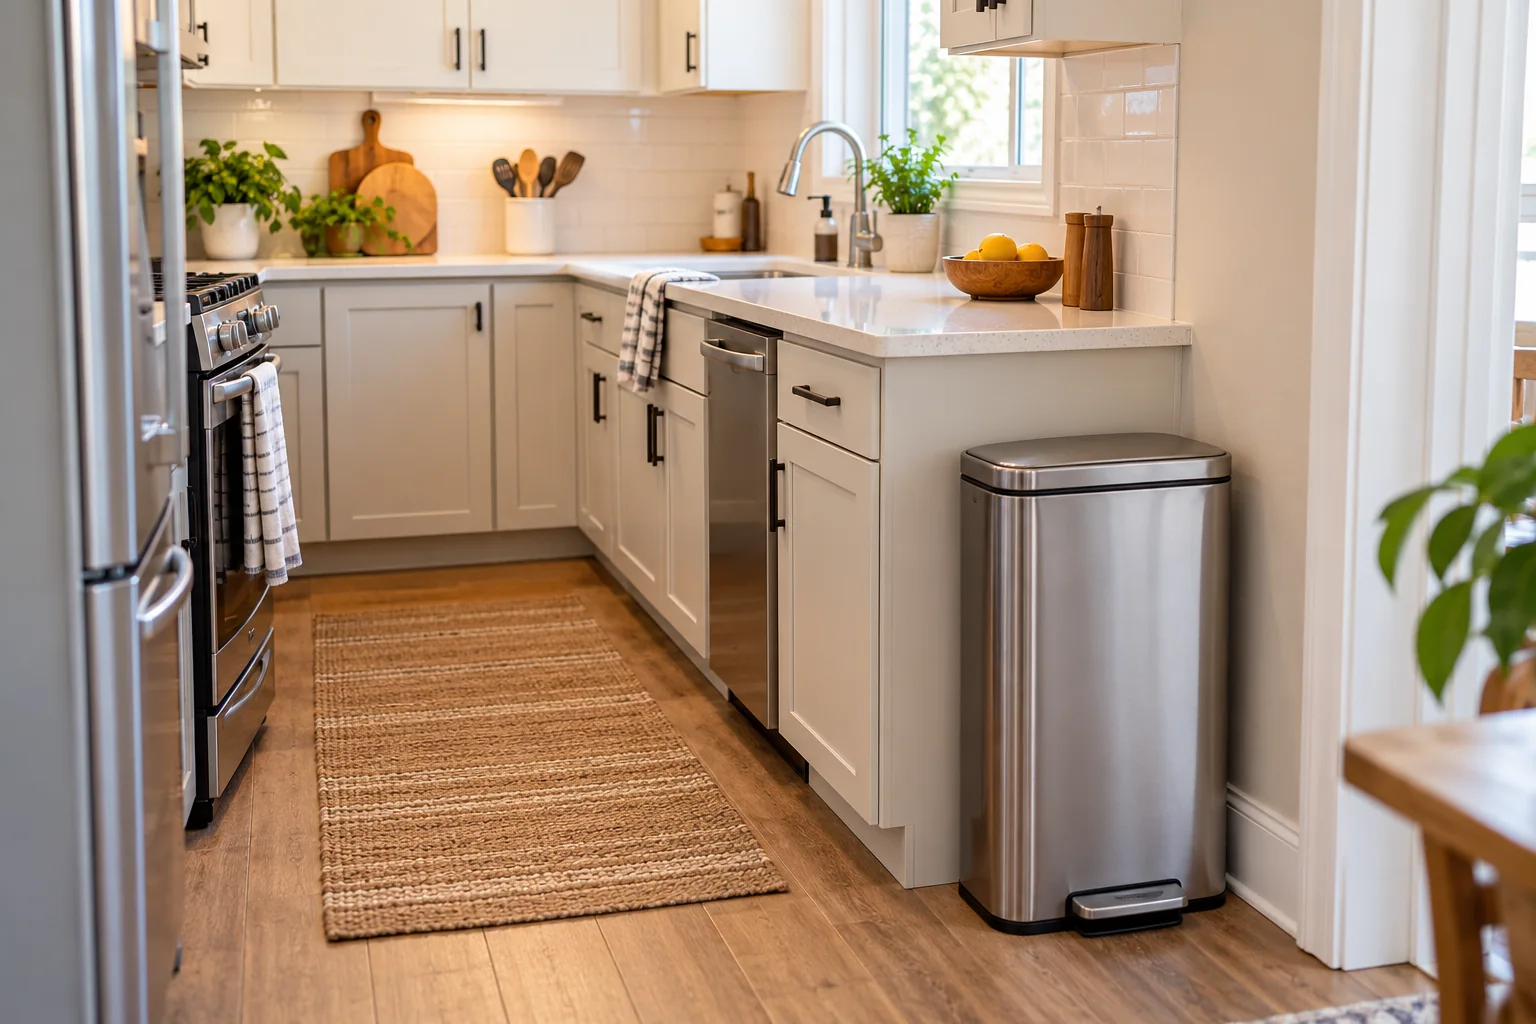
Where to Put a Trash Can in a Small Kitchen Without Blocking Your Workflow
A trash can can fit in a small kitchen and still be in the wrong place.
The problem usually shows up after you start using it. The lid hits the counter. The dishwasher door blocks the pull-out. A narrow bin fits beside the refrigerator, but the refrigerator can no longer open the way you need it to. An under-sink bin clears the pipes while empty, then becomes awkward to lift out once the bag is full.
So if you are trying to decide where to put a trash can in a small kitchen, do not start by asking which location looks neatest. Start by asking which location still works when the bin, nearby doors, the full bag, and the people in the kitchen are all moving.
That is the purpose of the OrganizeSmartly Trash Placement Fit Test:
PATH → CANDIDATES → ENVELOPE → ACCESS → SERVICE → TEST
Before you use it, set a few household requirements. Then test only the locations that have a real chance of working. A good result might be a pull-out or compact bin, but it might also be the trash can you already own moved to a better spot. Buying nothing is a valid outcome.
This is an OrganizeSmartly editorial decision method, not a building-code, sanitation, ergonomics, or accessibility standard. Product dimensions, installation requirements, and appliance clearances should always be checked against the exact current manufacturer information for the items in your kitchen.
Quick Navigation
Affiliate disclosure: This guide contains affiliate links. If you purchase through one of our links, OrganizeSmartly may earn a commission at no additional cost to you. We recommend products based on problem-solution fit, dimensions, and practical usefulness. Read the disclosure.
Set the Requirements Before You Pick a Spot
Before you measure cabinets or browse trash cans, define what the location actually has to support.
What waste are you trying to place?
Start with the real waste system in your kitchen.
Do you need one main trash bin? Do you also keep recycling in the kitchen? Do you use a small food-scrap container separately? A second stream changes the amount of space you need, and it may be better to split two jobs instead of forcing everything into one oversized station.
Do not assume that trash and recycling have to live side by side. In a very small kitchen, co-locating them may create a wider footprint than the room can support.
How often are you willing to empty it?
Capacity is not just a gallon number. A smaller bin may fit more easily, but only if the household is comfortable emptying it often enough. A larger bin may reduce trips outside but create a bigger footprint, a harder bag-removal path, or a cabinet-fit problem.
There is no universal “right” trash-can size for a household. Use your own waste volume and acceptable emptying routine as the requirement.
Who has to use the bin?
Consider the people who actually cook, clean, and move through the room.
If two people commonly use the kitchen at the same time, a location that works for one person may fail when someone else needs the refrigerator or passes through the aisle. If ordinary bending, reaching, or opening motions are inconvenient for someone in the household, include that in your test without turning it into a medical or compliance claim.
Do pets, young children, or rental rules remove options?
If a pet regularly investigates exposed trash, that is a real household constraint. If you rent, drilling into a cabinet door, fastening a pull-out, or anchoring freestanding furniture may be off the table unless you have permission.
Use precise language here. “No-drill” and “requires mounting” are more useful than calling something broadly renter-safe. Likewise, do not assume that a concealed bin is automatically pet-proof.
Once these requirements are clear, move to the first step of the fit test.
PATH: Map Where Your Kitchen Waste Actually Happens
The best trash location is not necessarily the geometric center of the kitchen or the spot closest to the sink. It should make sense for the waste your household repeatedly creates.
Watch a normal meal or cleanup cycle and note where trash begins.
Common waste trips include:
- grocery packaging near the refrigerator or counter
- peels, wrappers, and scraps during prep
- plate scraping after meals
- cleanup around the sink and dishwasher
- carrying a full bag toward the normal exit
You do not need a formal floor-plan analysis. You are looking for repeated movement.
For example, if most waste happens during prep and cleanup, a bin at the far end of a narrow galley may technically be out of the way but create constant back-and-forth trips. If the bin sits right beside the prep area but blocks the dishwasher whenever it opens, proximity has solved one problem by creating another.
If the bigger issue is that your prep zone itself is overcrowded, use the guide to organizing kitchen counters in a small kitchen instead of making the trash-can location responsible for fixing the counter layout.
The output of PATH should be simple: two to four zones that are close enough to the tasks that matter and worth testing further.
CANDIDATES: Shortlist Location × Bin-Format Pairs
A location by itself is not a complete candidate.
“Under the sink” can mean a loose compact bin, a pull-out, or a small door-mounted container. “At the end of the cabinet run” can mean a narrow step can, a lidless open-top bin, or a taller freestanding can with a swinging lid. Those formats use the same location differently.
Treat each candidate as a pair:
Location × Bin Format
Possible pairs might include:
- sink base + loose compact bin
- sink base + pull-out
- dedicated base cabinet + pull-out
- dedicated cabinet + loose interior bin
- cabinet end or wall edge + slim freestanding step can
- cabinet door + small mounted or hanging caddy
- adjacent secondary location + main freestanding bin
Do not create a shopping list. Create a shortlist of systems that fit your actual kitchen.
Eliminate obvious failures first
Before detailed measuring, remove candidates that already fail on a hard constraint.
A candidate probably does not deserve more work if:
- plumbing or another fixed obstruction clearly occupies the needed space
- there is no cabinet storage you can reasonably give up
- installation is not allowed
- the bin or cabinet door obviously collides with an appliance
- the open system blocks the household’s normal passage
- a pet or child access concern remains unresolved
- the size or emptying routine is obviously incompatible with how the household uses trash
Aim for a short list. Two or three realistic candidates are more useful than ten ideas copied from a generic roundup.
ENVELOPE: Measure the Full Operating Space
This is the step that catches many small-kitchen failures.
A trash can has a parked footprint, but it also has an operating envelope. For this article, that means:
all the space the bin, its moving parts, the full bag or bucket, the user, and nearby doors or appliances need while the trash system is actually being used.
A product can fit while closed and still fail every evening at dinner cleanup.
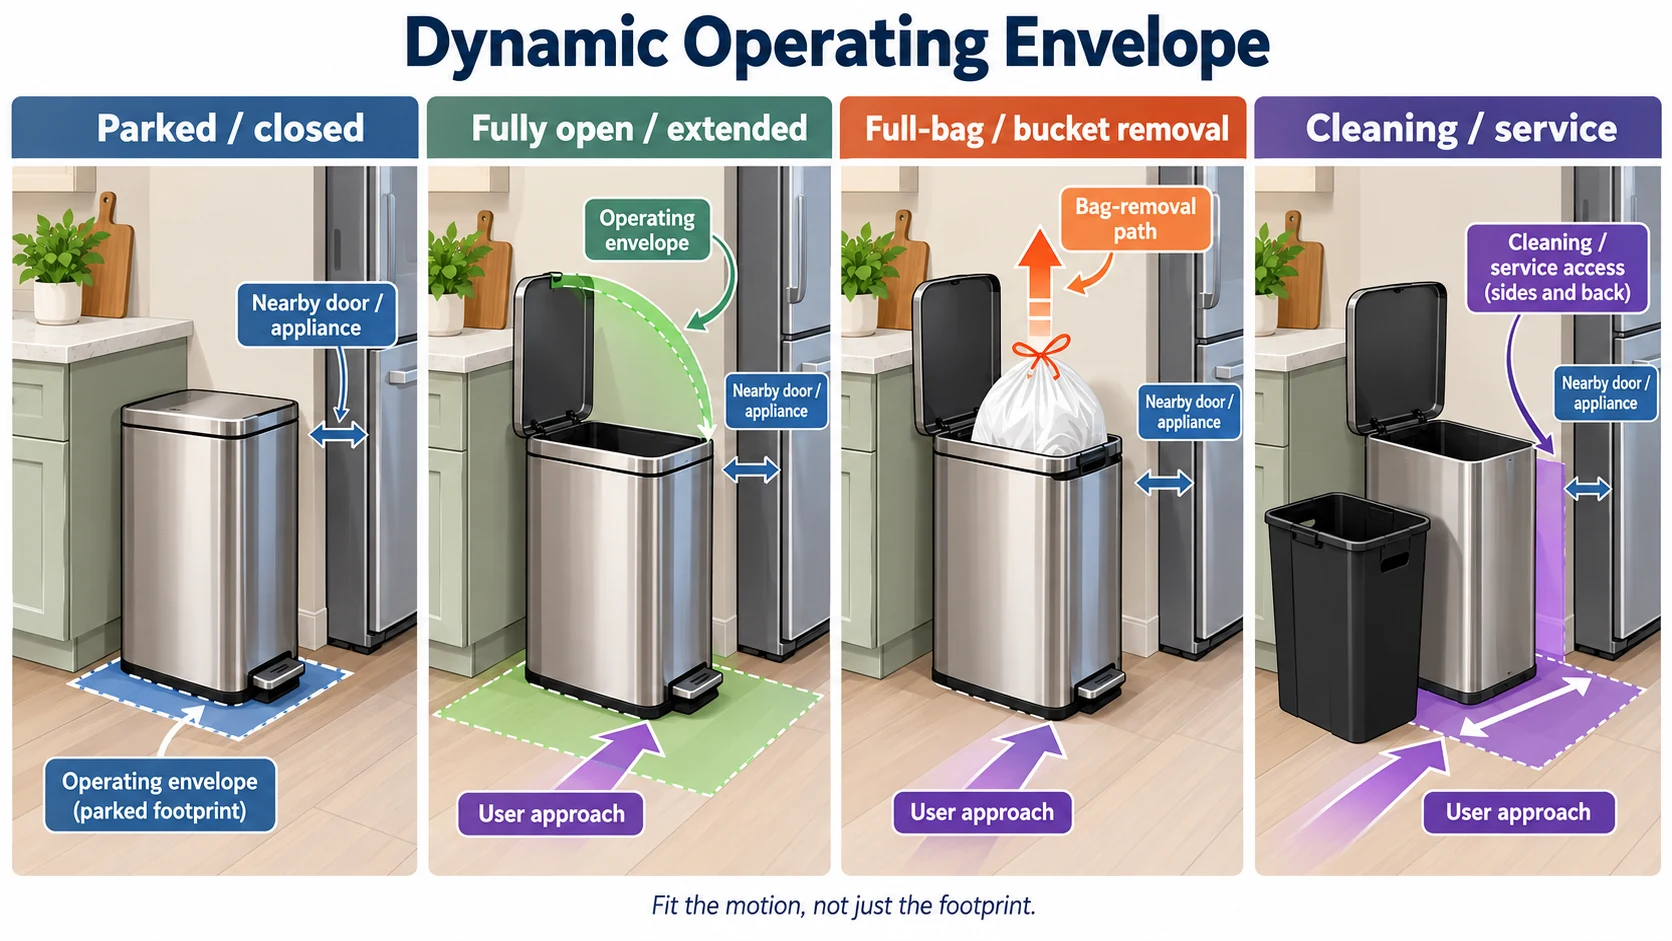
Check four states
For each candidate, test these four states.
1. Parked or closed
Measure the footprint and height in its normal resting position.
For a cabinet route, measure the actual clear opening and the obstruction-free interior, not just the nominal cabinet label. Face frames, hinges, sink bowls, pipes, disposers, hoses, outlets, filters, and door hardware can reduce usable space.
Manufacturer fit information is model-specific. A product marketed for a nominal cabinet size can still publish a different minimum clear opening. The exact product drawing or manual controls.
2. Fully open or extended
Now open everything that moves.
That may include:
- a lid or flap
- a cabinet door
- a slide-out frame
- a tilt-out front
- a pedal and the foot position needed to use it
- a removable inner bucket
For a pull-out, do not assume the unit’s depth tells you exactly how far it travels. Use the selected product’s current manufacturer information and physically test the front area where the system will extend.
3. Full-bag or bucket removal
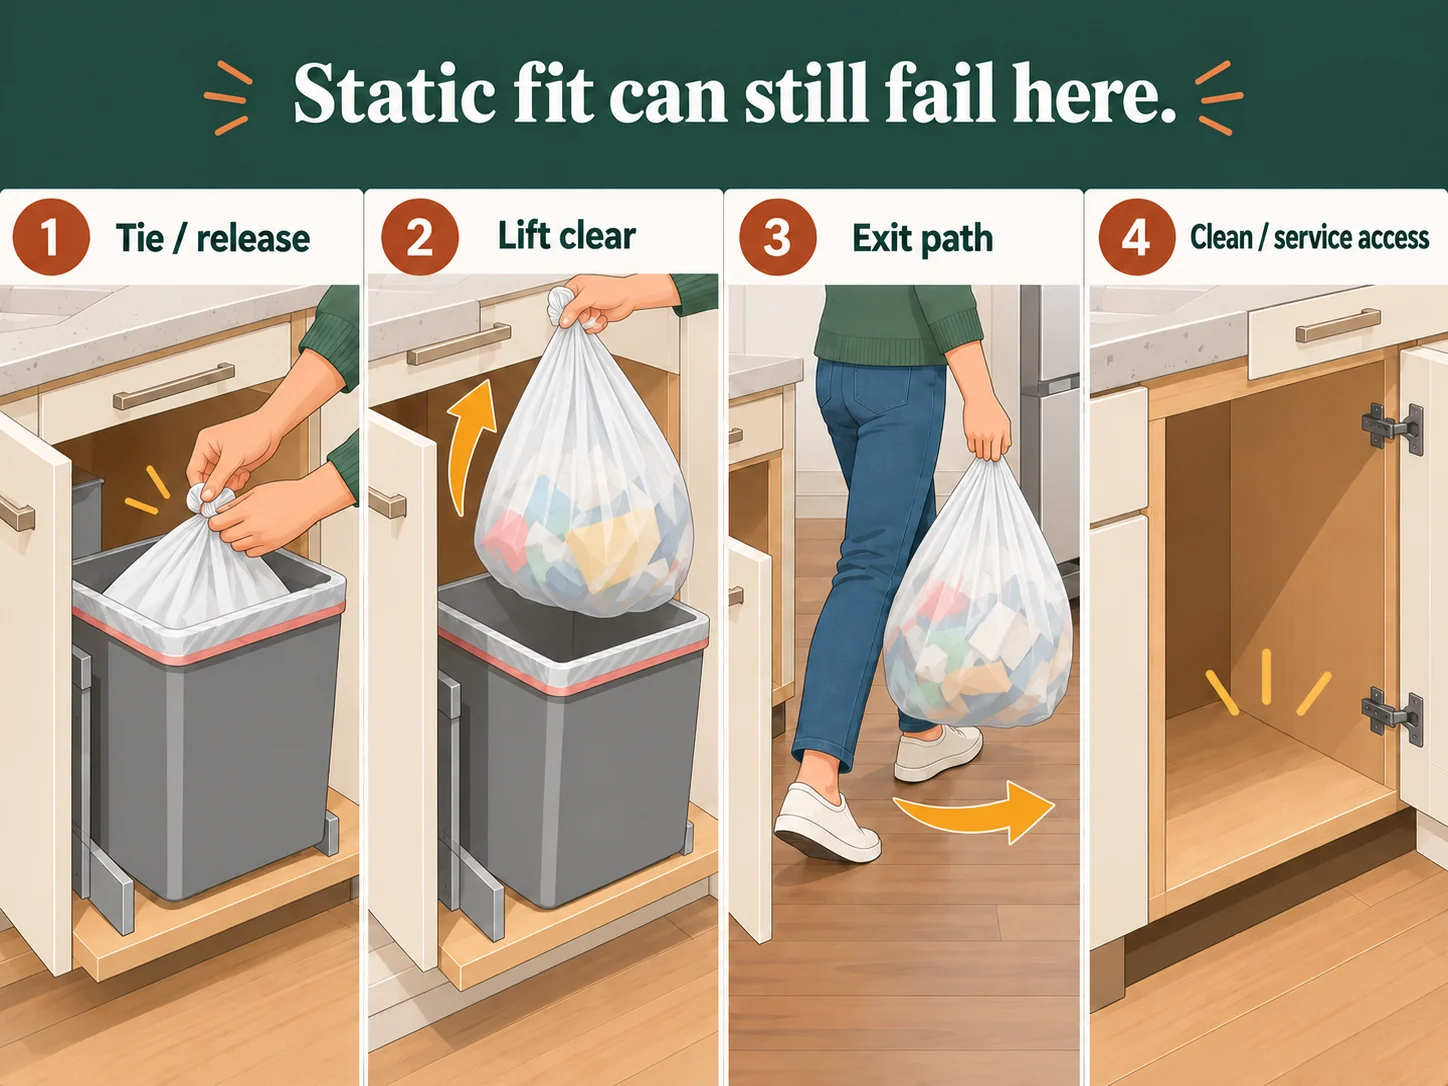
A bin is not usable if you can fill it but cannot remove the contents easily.
Check whether you can:
- release or lift the bucket
- gather and tie the liner
- lift a realistically full bag past the lid, cabinet lip, face frame, or shelf
- angle the bag out if vertical lift is limited
- carry it through the kitchen without immediately colliding with another door or narrow passage
A tight cabinet may pass the empty-bin test and fail here.
4. Cleaning or service state
Imagine the bin is empty and something has leaked behind it.
Can you reach the floor, cabinet corners, rails, and nearby surfaces? If the bin is under the sink, can you still reach the plumbing and shutoffs you need to keep accessible? If it sits beside an appliance, does the placement interfere with the appliance’s required access or removal?
Cleaning methods vary by material and product. The placement question is whether you can reach what needs cleaning, not whether one universal cleaner should be used everywhere.
ACCESS: Test the Discard Action During Real Tasks
A location can pass the measuring step and still be annoying every time someone throws something away.
ACCESS is about the actual action:
approach → open → deposit → close → return to the task
Try it during the kitchen activities that create the most waste.
Test it with your hands occupied
During food prep or cleanup, your hands may be wet, messy, or holding a plate. A cabinet route that requires opening one door and then pulling another mechanism may be acceptable for one household and frustrating for another.
The point is not to count motions as if there is a universal ideal. The point is to notice whether the sequence feels workable in your kitchen.
Test the nearby appliance at the same time
If the trash system is near the dishwasher, open the dishwasher and the trash route together. If it is beside the refrigerator, use the refrigerator the way you normally do while the bin is in place. If a drawer or cabinet door overlaps the bin’s operating area, test both states.
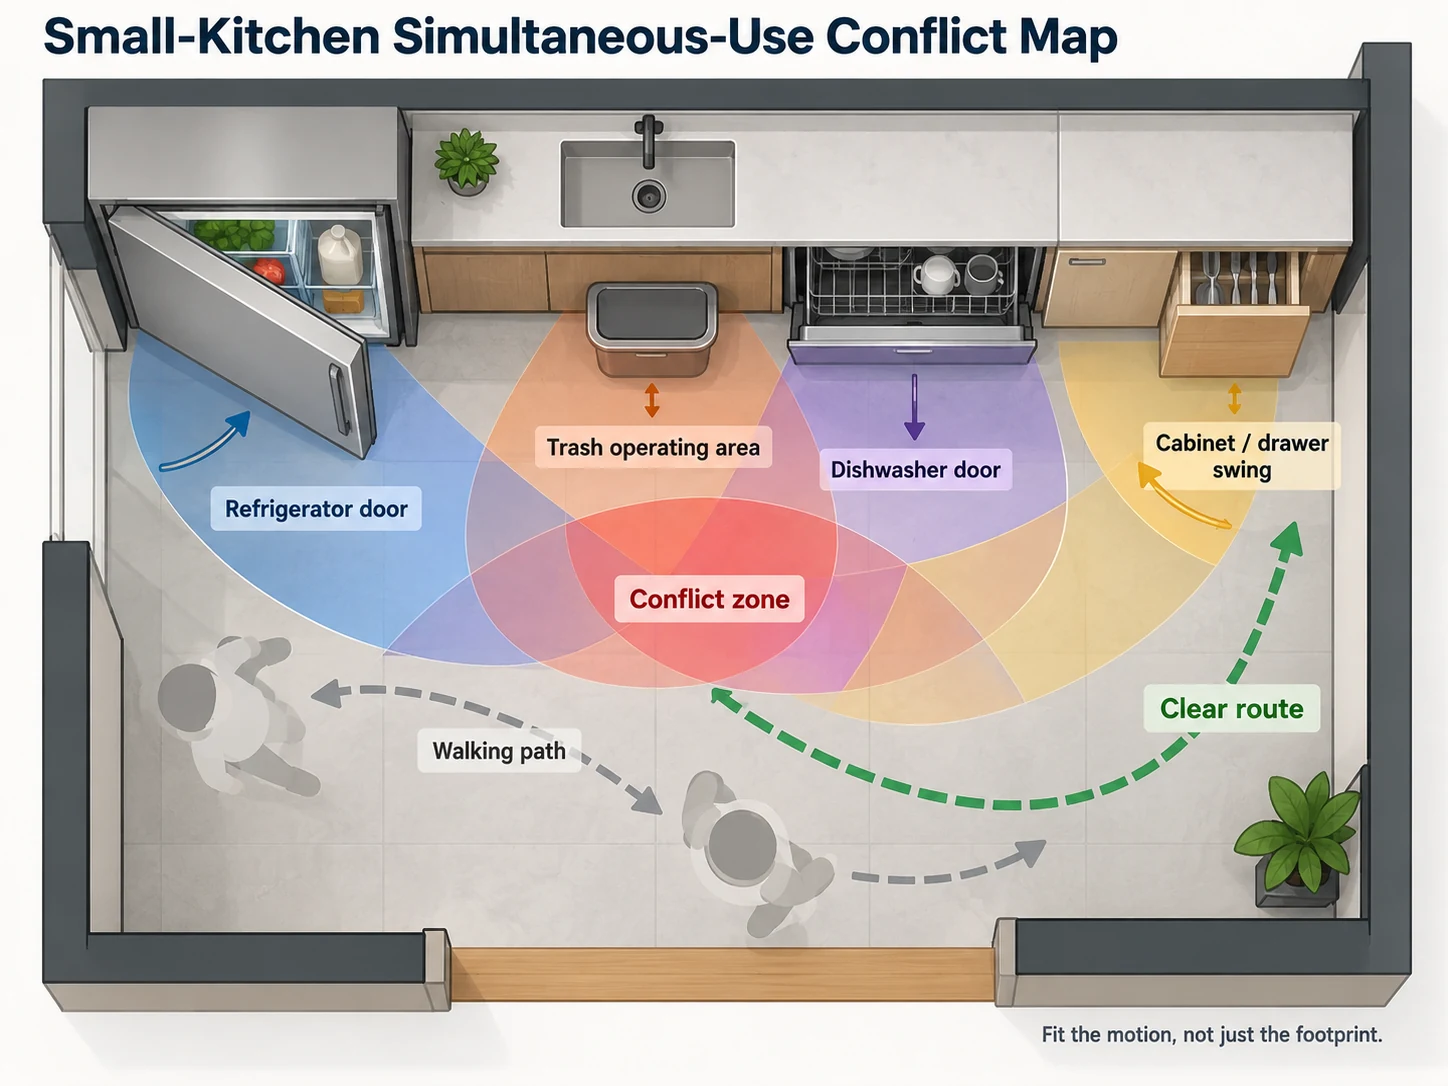
The worst relevant state matters more than the neat closed-state photo.
Include another person if the kitchen is tight
If two people commonly share the room, have one person use the bin while another passes or opens the refrigerator.
A placement that feels generous with one person standing still can become the kitchen’s most reliable argument generator once two humans arrive with groceries.
Keep the conclusion practical: can the household use this location without repeatedly moving the bin, closing another appliance first, or stepping around the open mechanism?
SERVICE: Make Sure You Can Empty, Reline, Clean, and Reach What Matters
Trash placement is not finished when the waste drops into the bin.
You also have to empty it, replace the liner, clean spills, and maintain anything around it.
Check the full-bag routine
Use the liner you actually expect to use or a safe bulky stand-in.
Can you tie the bag without pulling the whole bin into the walkway? Can you lift it clear without snagging? Is there enough room to replace the liner afterward?
If the bin is inside a cabinet, a small difference between parked clearance and removal clearance can matter much more than the closed appearance.
Check cleaning access
A concealed system may clear visible floor space, but spills can move inside the cabinet, around a frame, or behind rails.
Ask whether you can reasonably reach:
- the cabinet floor
- back corners
- the sides of the bin
- pull-out rails or frame surfaces
- the floor beneath a freestanding can
Do not assume hidden trash is cleaner. It is simply hidden.
Preserve utility and appliance access
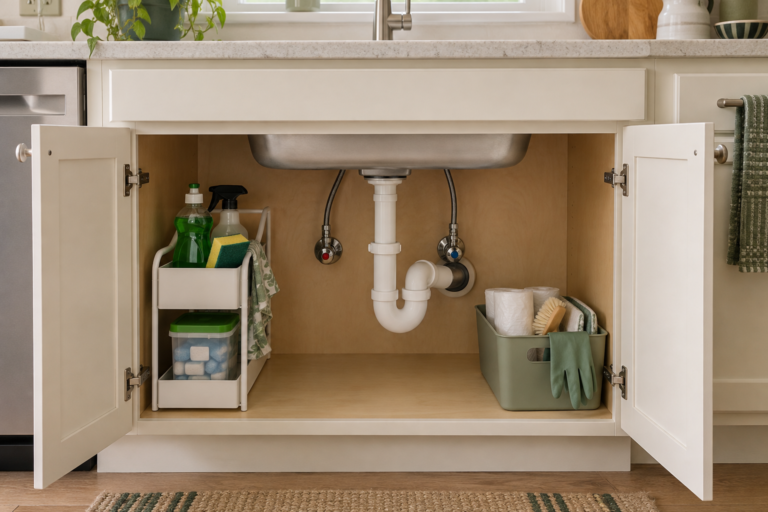
Under-sink trash should not turn the sink cabinet into a sealed-off box. Pipes, shutoffs, hoses, outlets, and other service points may need access.
If your real challenge is organizing the whole sink base around plumbing and household supplies, use the guide to organizing under the kitchen sink instead of expanding the trash section into a second under-sink article.
The same rule applies beside appliances. The trash location should not interfere with whatever access the exact appliance manufacturer requires for normal opening, maintenance, or removal.
TEST: Run the Trash Placement Fit Test Before You Buy or Drill
Once a candidate has passed PATH, CANDIDATES, ENVELOPE, ACCESS, and SERVICE, simulate real use before committing money or making permanent changes.
A cardboard box, painter’s tape, or your existing bin can often reveal a bad location before a new product arrives.
Prep Test
From the actual prep position, discard typical scraps or packaging using the candidate route.
Watch for:
- repeated detours
- dripping or carrying waste across a walkway
- a lid or door that interrupts the prep motion
- a bin that has to be dragged closer every time
Cleanup Test
Simulate the sequence you actually use after a meal: scrape, sink or rinse, dishwasher, trash.
Open the dishwasher and the candidate trash system in the states normally used together. If one blocks the other, the problem is not theoretical. It is part of the daily cleanup route.
Full-Bag Test
Use a safe bulky stand-in or realistically filled liner.
Tie it, lift it, clear the opening, and carry it toward the household’s normal exit. A location that only works with an empty bag has not passed.
Cleaning and Service Test
Remove the bucket or frame only as the design allows and confirm that surrounding surfaces and required service points remain reachable.
For an under-sink route, this includes making sure the trash setup does not trap the parts of the cabinet that must remain accessible.
Household Conflict Test
Where relevant, have a second person pass, use the refrigerator, open a nearby door, or work at the sink while the trash system is operating.
You are not trying to reproduce every possible kitchen event. You are checking the one or two collisions most likely in your layout.
Compare the Main Placement Routes by Where They Fail First
There is no universal best place for a trash can in a small kitchen. Each route trades one problem for another.
Under the sink
When it can work: The sink base has a genuinely usable pocket after plumbing, the bag can be removed, and valves or service points remain reachable.
Fails first when: Pipes, sink bowl, disposer, hinges, hoses, or outlets break up the space; the opening is too small; or the full bag cannot be lifted out comfortably.
Measure/check: Actual obstruction-free width, depth, and height; opening; door swing; bag lift-out; utility access.
Tradeoff: It hides trash and uses an existing cabinet, but it competes with under-sink storage and service access.
If the bigger problem is the cabinet itself rather than trash placement, hand the problem back to the under-sink organization guide instead of forcing a bin into the remaining space.
Dedicated base cabinet or pull-out
When it can work: A base cabinet is genuinely available, the exact system fits the clear opening, and the household accepts the lost cabinet volume.
Fails first when: The cabinet is needed for other storage, the pull-out projects into a narrow aisle, a dishwasher or door overlaps it, or permanent installation is not appropriate.
Measure/check: Exact clear opening, hinges and face frame, mounting surface, front projection, full-bag lift-out, and the selected system’s current manual.
Tradeoff: It can remove a freestanding bin from the floor, but it does not make space appear from nowhere. It converts cabinet storage into trash storage.
If cabinet allocation becomes the larger problem, use the guide to organizing kitchen cabinets in a small kitchen.
If freestanding floor placement keeps failing but a dedicated base cabinet passes the fit test, a bottom-mounted pull-out can be a targeted mechanism change. The Rev-A-Shelf RV-12KD-17C S is a single 35-qt option with full-extension slides and cabinet-floor mounting; it only makes sense when the actual cabinet opening and interior, full extension, bag removal, cleaning access, and nearby-appliance states all work.
Measure First
Measure the actual clear opening and obstruction-free interior width, depth, and height; check face-frame and hinge intrusion and confirm a suitable cabinet-floor mounting surface. Compare the product footprint of approximately 10-5/8 in W × 22 in D × 19-1/4 in H against the actual cabinet, then test the full-extension front operating envelope, bin and full-bag removal, cleaning access, cabinet-door behavior, and nearby dishwasher, refrigerator, drawer, or walkway conflicts. Do not rely on nominal cabinet size alone.
Best For
A dedicated base-cabinet route with verified geometry when freestanding floor placement is the diagnosed problem, losing cabinet storage is acceptable, and four-screw cabinet-floor mounting is authorized.
Skip If
There is no spare cabinet; cabinet-storage loss is unacceptable; drilling or mounting is not permitted; the actual opening, depth, face frame, hinges, or interior obstructions prevent fit; full extension collides with another door, appliance, or walkway; full-bag removal or cleaning access fails; or the existing setup can be fixed without buying new hardware.
Space Gain
Removes the main trash can from visible floor space, but it does so by converting cabinet volume into trash storage rather than creating new storage.
Effort
Moderate setup because the bottom-mounted frame must be positioned and secured with four screws. Ongoing use stays low only if full extension, liner changes, bag removal, and cleaning remain unobstructed.
Renter-Safe
Not a no-drill route. Skip unless cabinet modification is permitted and the installation or restoration burden is acceptable.
Kitchen
Rev-A-Shelf RV-12KD-17C S 35 Qt Pull-Out Waste Container
A single 35-qt in-cabinet waste pullout with a polymer bin in a chrome wire frame on full-extension ball-bearing slides. It mounts to the cabinet floor with four screws.
Check on Amazon (opens in a new tab)Freestanding edge or slim format
When it can work: There is a non-traffic edge where the entire operating envelope fits and no cabinet modification is needed.
Fails first when: A narrow body is still too deep, the lid hits a wall or counter, the pedal puts a foot into the aisle, the refrigerator needs the same space, or the smaller capacity creates an unacceptable emptying routine.
Measure/check: Width, depth, height, lid movement, pedal approach, bag lift-out, baseboard gap, and nearby appliance swing.
Tradeoff: It preserves cabinet storage and is easy to relocate, but it uses visible floor area.
A slim bin is not automatically a space-saving win. It solves width only if depth, opening motion, capacity, and bag removal still work.
If this edge location passes the fit test and width is the remaining problem, changing the bin format can make sense. The simplehuman 45L Slim Step Can (CW2044) is a freestanding option for that specific diagnosis; its narrow body does not remove the need to test depth, lid movement, pedal approach, and full-bag removal.
Measure First
Measure the candidate zone’s usable width, depth, and height, then test the full lid-open and pedal-use envelope. Confirm that the 21.5-inch body depth does not project into the normal passage or conflict with nearby doors or appliances, and leave enough room to lift and replace a full liner.
Best For
A measured wall edge, cabinet end, or other freestanding route where width is the diagnosed constraint, cabinet conversion is unnecessary, and the complete operating envelope passes.
Skip If
Depth is the real constraint; the lid or pedal conflicts with a wall, counter, appliance, drawer, door, or walkway; full-bag removal is awkward; the 45 L capacity does not fit the household’s emptying routine; or the existing bin already passes after relocation.
Space Gain
Preserves cabinet storage and reduces the floor width required by the bin body versus a wider freestanding format, but it does not reduce its 21.5-inch depth or create new floor area.
Effort
Low installation effort because the can is freestanding. Ongoing effort stays low only if pedal access, liner changes, and full-bag removal work cleanly in the chosen spot.
Renter-Safe
Favorable from an attachment standpoint because no cabinet drilling or conversion is required. Physical fit and any household or lease restrictions still control.
Kitchen
simplehuman 45L Slim Step Can with Liner Rim
A 45L slim-profile freestanding step can with a steel pedal, hinged slow-close lid, and liner rim.
Check on Amazon (opens in a new tab)Door-mounted or hanging small-bin route
When it can work: A small, specific waste stream needs a close disposal point and the door, hinge, mounting method, and internal clearance all support it.
Fails first when: The door cannot close, shelves or plumbing collide with the bin, capacity is too small for the intended job, or mounting is not permitted.
Measure/check: Door and panel compatibility, swing, closure, internal collision, mounting method, and realistic emptying frequency.
Tradeoff: It may remove a small container from the floor, but it adds load and movement to the door and often works better as a secondary caddy than as the main kitchen trash can.
Adjacent or secondary location
When it can work: No internal kitchen candidate passes, but an adjacent location near the normal route can hold the main bin without creating a worse circulation problem.
Fails first when: Every discard becomes a long detour, the bin interferes with another room or doorway, or carrying wet scraps across the space becomes the new problem.
Measure/check: Travel path, doorway conflict, full-bag exit, and whether the location is genuinely used instead of avoided.
Tradeoff: It can release precious kitchen space, but it increases distance from the work that creates waste.
Split system for separate waste tasks
Sometimes one bin cannot satisfy every job.
A small secondary scraps container near prep plus a main trash bin elsewhere may work when the prep route and main-bin route genuinely need different locations. A trash-and-recycling pair may also make sense if the household already maintains two streams and the combined footprint passes the same tests.
Do not create a split system just because another container fits. A second bin also adds another emptying and cleaning task.
What to Change When a Candidate Fails
A failed test is useful because it tells you what kind of problem you have.
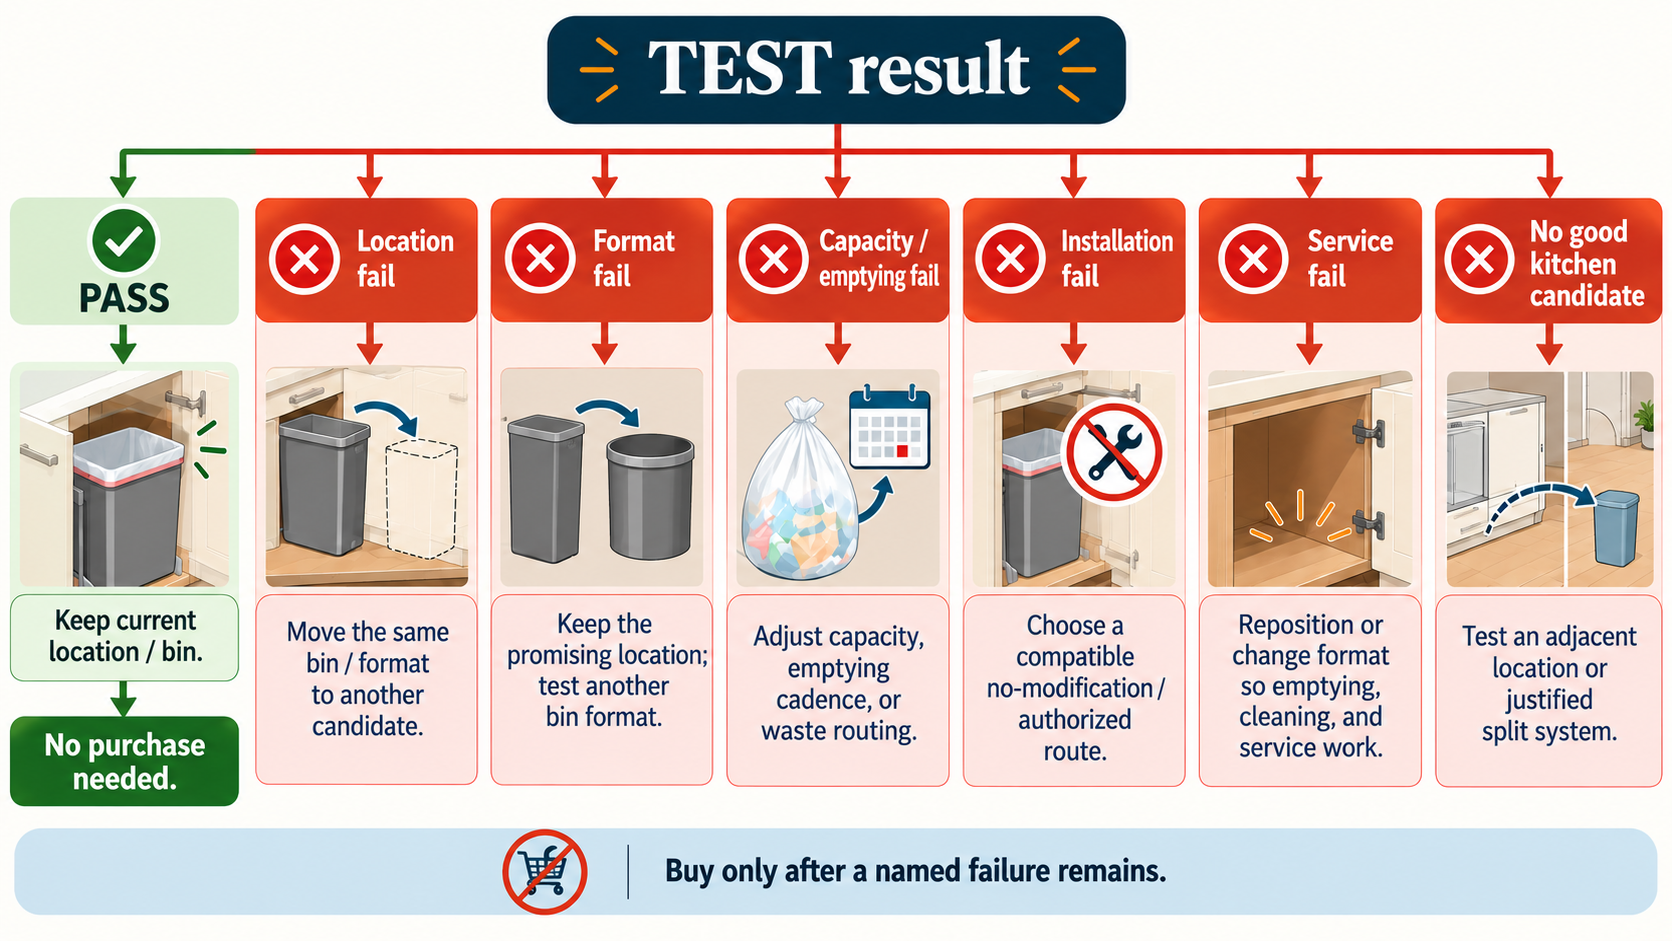
Location fail
The bin format itself may be fine, but the chosen spot conflicts with an appliance, doorway, traffic route, or cleanup sequence.
Try first: move the same bin to another candidate zone.
Format fail
The location is promising, but the lid, pedal, pull-out, depth, or opening mechanism creates the conflict.
Try first: test another format in the same location before abandoning the zone.
Capacity or emptying fail
The candidate physically fits, but the bin fills too quickly or the bag-removal routine is impractical.
Try first: reconsider the capacity and emptying routine, or separate a specific waste task if that actually reduces the problem.
Do not solve this with a universal gallon formula.
Installation fail
The location works only if you drill, anchor, modify a cabinet, or use hardware you cannot properly install or authorize.
Try first: choose a freestanding or otherwise compatible route rather than forcing the installation.
Service fail
The bin works for daily discards but blocks cleaning, plumbing, appliance access, or full-bag removal.
Try first: change the position or format. Hiding the failure behind a cabinet door does not make it disappear.
No good kitchen candidate
If every internal location introduces a worse conflict, test an adjacent location or a split system that matches the household’s actual route.
This is not a unique trick. Utility areas, pantries, and nearby exit routes are common alternatives. The useful question is whether the fallback passes the same movement and service tests.
No purchase needed
If your current trash can works after relocation or a simple setup change, stop there.
A purchase should solve a named failure. It should not be the reward for reaching the end of an organizing article.
Decide When New Trash Hardware Actually Helps
Only consider new hardware after the fit test leaves a specific unresolved problem.
Examples of legitimate category-level remedies include:
- a slimmer freestanding or step format when width is the binding constraint and an edge location otherwise passes
- a dedicated pull-out when a suitable cabinet exists and floor placement repeatedly fails
- a compact under-sink format when the sink base has verified usable geometry after plumbing and service access
- a door-mounted or hanging small bin when a specific low-volume waste stream needs a close disposal point
- a dual system when the household genuinely uses two in-kitchen waste streams and the combined footprint works
- tilt-out furniture only when there is a real wall-edge footprint and any required anchoring can be followed
None of those categories is automatically better than moving the bin you already own.
When product research begins later, every candidate should be evaluated using exact current manufacturer evidence for dimensions, minimum opening, mounting, moving parts, capacity, liner compatibility, care, and any relevant installation requirement.
Fit guidance should remain outside the eventual product card. The OrganizeSmartly article-card standard is intentionally minimal, so Measure First, Best For, Skip If, and similar decision guidance belong in the article where the reader can evaluate the product before seeing the Amazon CTA.
Frequently Asked Questions
Is it better to keep a kitchen trash can under the sink or out in the open?
Neither is universally better. Under-sink placement can remove the bin from visible floor space, but it competes with plumbing, service access, cabinet storage, and bag-removal space. A freestanding bin uses floor area but can be easier to move, clean around, and replace. Compare the actual operating envelope and daily routine in your kitchen.
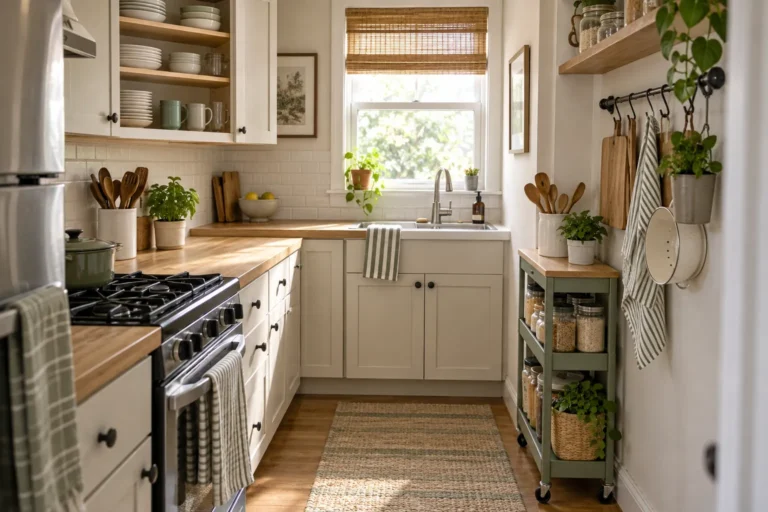
Where should a trash can go in a galley kitchen?
Test the locations that interfere least with the galley’s narrowest real-use states. An end-of-run freestanding position, a verified cabinet route, an under-sink route, or an adjacent location may work. Open the dishwasher, refrigerator, and trash system in the combinations you actually use. Do not rely on one universal aisle number.
Can a trash can go next to the refrigerator?
It can if the refrigerator still opens and functions the way its exact model requires, the bin does not block drawers or handles, and the household can still pass normally. Check the appliance manual and test the door in the real kitchen rather than assuming the narrow gap is unused space.
How do you hide a trash can in a small kitchen?
Possible concealed routes include an interior cabinet, pull-out, under-sink system, tilt-out furniture, or a small door-mounted option. Concealment is only an improvement if the system also passes the ENVELOPE, ACCESS, SERVICE, and TEST stages. Hidden does not automatically mean easier to use or easier to clean.
How do you know if a pull-out trash can will fit a cabinet?
Use the exact current product drawing or manual. Measure the actual clear opening and obstruction-free interior width, depth, and height; check hinges and face frames; verify the mounting surface; and test the front operating space and bucket or bag removal. A nominal cabinet size alone does not guarantee fit.
What if there is no room under the sink?
Treat under-sink as only one candidate. Test a dedicated cabinet, a freestanding edge location, a small secondary door or hanging caddy for a specific waste task, or an adjacent main-bin location. If the sink-base problem is really about plumbing and storage organization, solve that separately rather than forcing the main trash can under the sink.
Where should trash and recycling go in a very small kitchen?
Start by confirming that both streams genuinely need to stay in the kitchen. Then compare co-located and separated options using the same footprint, opening, bag-removal, and emptying tests. A dual bin can reduce separate containers but may require more width or smaller compartments. Do not let the presence of two streams automatically dictate one large system.
The Best Trash-Can Location Is the One That Still Works in Motion
The smallest kitchen often makes the simplest advice unreliable.
“Put it under the sink.” “Hide it in a cabinet.” “Use a slim bin.” Each can work, but each can also fail once plumbing, door swing, bag removal, storage loss, or real household movement enters the picture.
Use the sequence instead:
Set Requirements → PATH → CANDIDATES → ENVELOPE → ACCESS → SERVICE → TEST
Then let the failure tell you what to change.
If the location works with the bin you already own, keep it. If the location works but the format fails, change the format. If no kitchen location survives real use, test an adjacent route. If a product is eventually needed, buy only after the measurements and failure mode are clear.
A trash can does not fit merely because its closed footprint fits. It fits when the whole system can be used, emptied, cleaned, and lived with without making a small kitchen harder to use.