How to Organize Kitchen Drawers So Everything Fits and They Still Close
A kitchen drawer can look organized and still work badly.
The compartments may be neat, but one long handle catches when the drawer closes. A tray may fit side to side while taking up so much usable space that bulky tools pile on top of one another. Everything may be visible on day one, yet putting a whisk back means rearranging three other utensils.
That is why how to organize kitchen drawers is not just a decluttering problem. It is a fit-and-function problem.
Before buying dividers, trays, or inserts, answer two questions:
- Will everything fit and will the drawer still close normally?
- Will the system stay easy to use and easy to put back together?
Those two questions are the framework for this guide.
Affiliate disclosure: This guide contains affiliate links. If you purchase through one of our links, OrganizeSmartly may earn a commission at no additional cost to you. We recommend products based on problem-solution fit, dimensions, and practical usefulness. Read the disclosure.
Start With the Drawer, Not the Organizer
An organizer is useful only if it solves a problem the drawer actually has.
Before deciding what goes where, clear enough of the drawer to inspect the real interior and the tools you expect it to hold. Do not start by assuming you need a new tray or divider. First find out what the drawer can physically support.
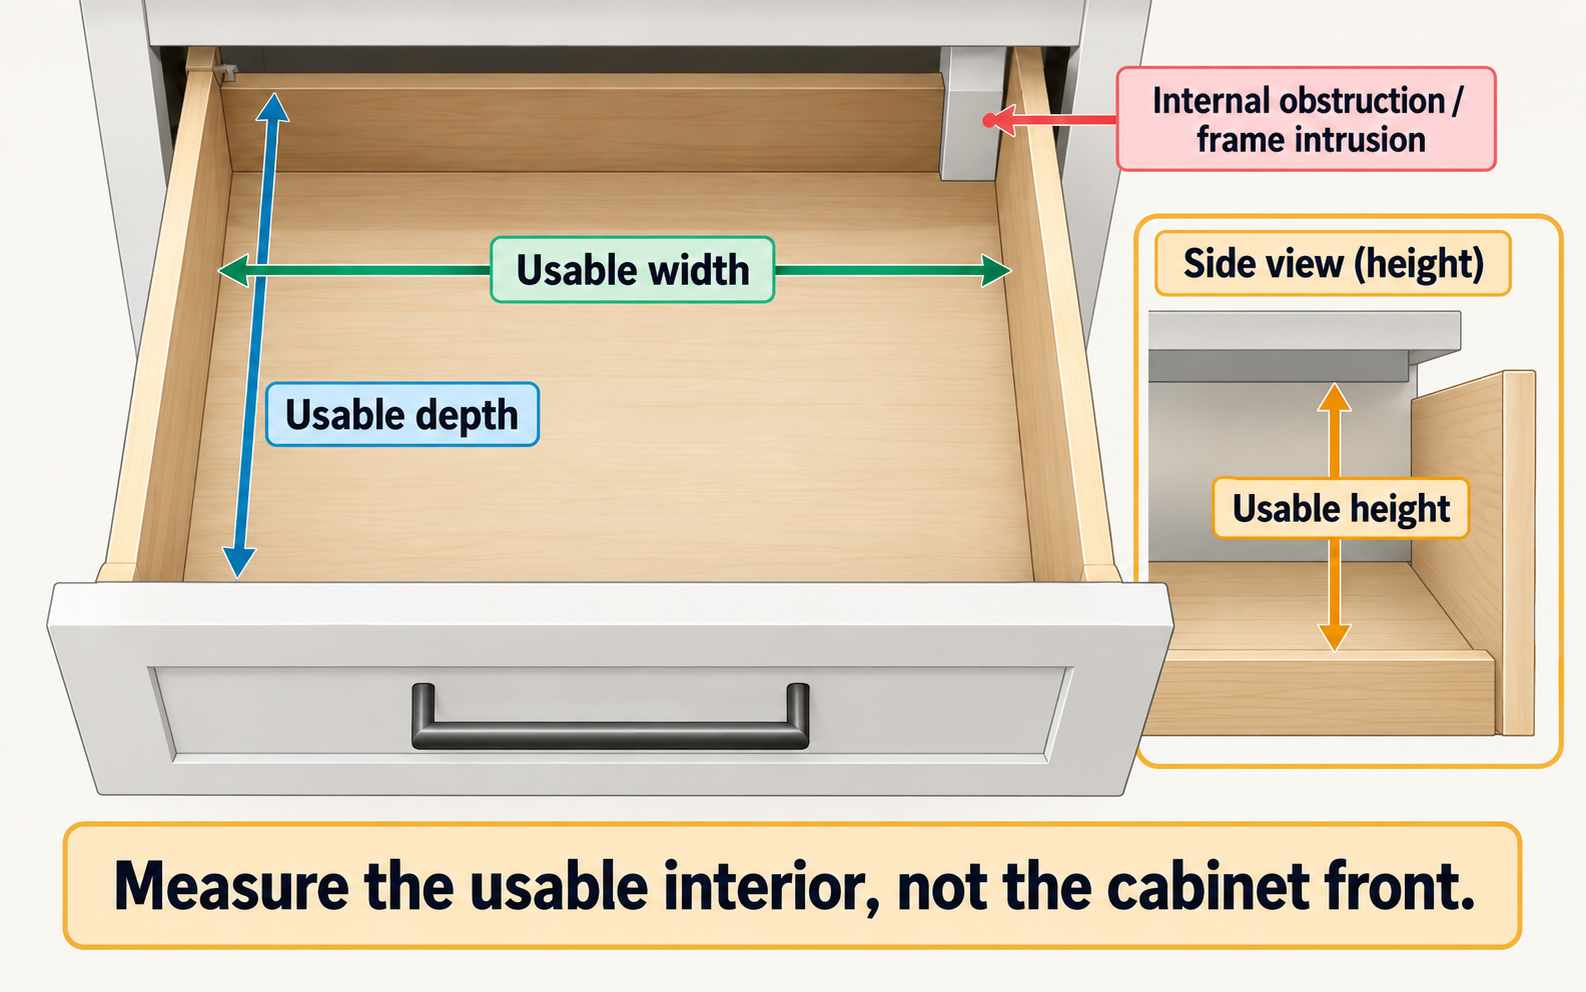
Measure the usable interior
Measure the drawer itself, not the cabinet front.
Record:
- usable inside width;
- front-to-back depth;
- usable height;
- any lip, frame, slide, or obstruction that reduces storage space.
Manufacturer measuring guidance for storage fittings consistently starts with the actual interior dimensions and fit conditions. Nominal cabinet width should not be treated as usable drawer width.
The important rule is simple:
Measure the space you can actually use.
Do not apply a universal subtraction rule from cabinet size to drawer size. Drawer construction and hardware vary.
Record the tool profile
Next, identify the items that are hardest to store.
Pay attention to:
- the longest utensil;
- the tallest or bulkiest handle;
- tools that cannot lie flat;
- rigid versus flexible items;
- tools that nest well and tools that do not;
- awkward curves or wide heads;
- sharp tools that need protected storage.
A utensil count alone says very little about fit. Ten slim tools can behave very differently from ten bulky ones.
Large utensils, deep drawers, and physical-fit problems deserve attention beyond generic decluttering advice, which often treats them as secondary.
Decide whether the tool belongs in this drawer
Do not group tools together only because they belong to the same category.
Use this order instead:
- What task does the tool serve?
- Does it physically fit?
- How often is it used?
- Can it be removed and returned without disturbing other tools?
- Is the location comfortable and safe for the intended user?
If the best location turns out to be a cabinet, that becomes a cabinet-organization problem rather than a reason to force the tool into a drawer.
Stage 1: Will It Fit and Still Close?
Stage 1 is purely mechanical.
A drawer should pass this stage before you worry about how polished the layout looks.
Check the usable geometry
Usable geometry is the space that remains after accounting for the drawer box and anything that intrudes into it.
A layout can fail when:
- the actual interior is narrower than expected;
- the organizer is too deep;
- a handle sits above the usable height;
- an insert interferes with the opening path;
- the back portion of the drawer becomes difficult to use.
Compare real drawer dimensions with the real dimensions of the tools and any organizer being considered.
Measure First
Record:
- interior width;
- usable depth;
- usable height;
- longest or tallest items;
- any obstruction that reduces clearance.
Do not rely on a universal “extra clearance” number. The correct clearance depends on the actual drawer, hardware, tools, and organizer.
Match the layout to the tool profile
Once the drawer dimensions are known, use the awkward items to test the layout.
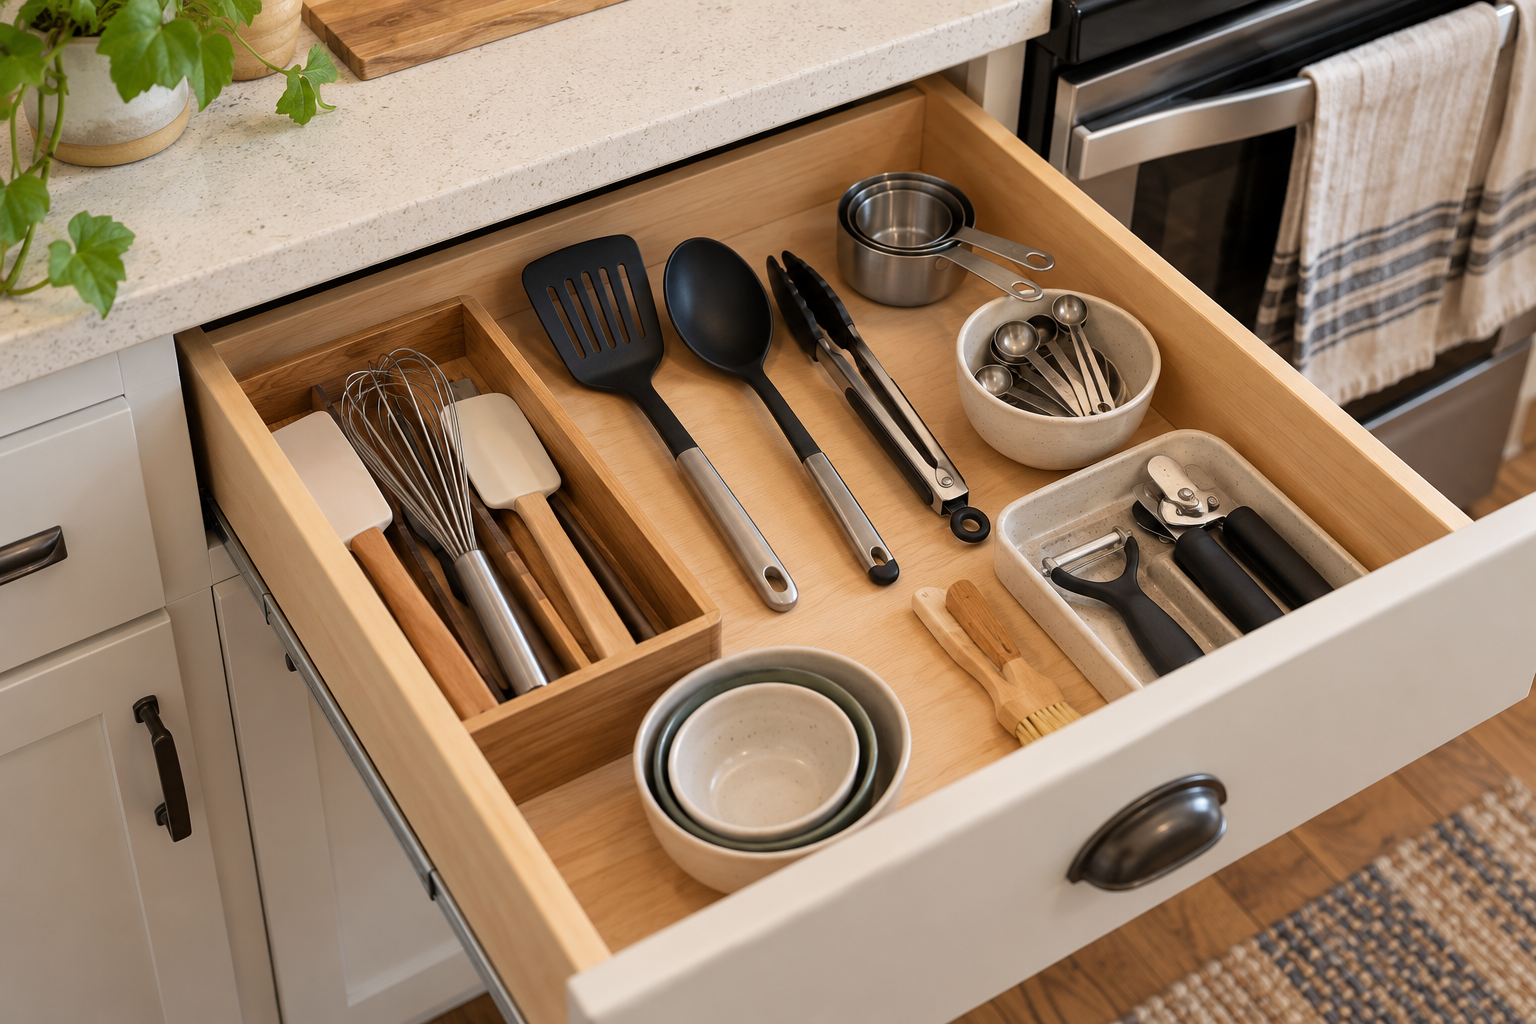
A long spatula may fit diagonally but consume space needed by several smaller tools. A bulky can opener may fit inside a compartment yet make neighboring utensils difficult to remove. A stiff whisk may sit higher than a flexible silicone utensil even if they are similar in length.
The goal is not to build a custom slot for every object.
The goal is to identify which tools control the layout.
Grouping works well when:
- the tools fit without interfering with closure;
- they can be removed without tangling;
- the task grouping makes sense;
- returning them does not require precise stacking.
Do not force a category to stay together if the drawer geometry makes that grouping awkward.
A system can be logically categorized and still be physically wrong.
Test Closure Fit
A drawer layout fails if the drawer stops working normally.
After arranging the intended contents, open and close the drawer several times.
Check whether:
- a tool catches;
- a utensil flips upward;
- a handle rubs against the top;
- an insert shifts into the opening path;
- the drawer needs an extra push;
- something must sit at one exact angle every time.
Jamming and hard-to-close drawers are often described as symptoms; treat normal closure as a pass/fail test for the layout.
Use this practical rule:
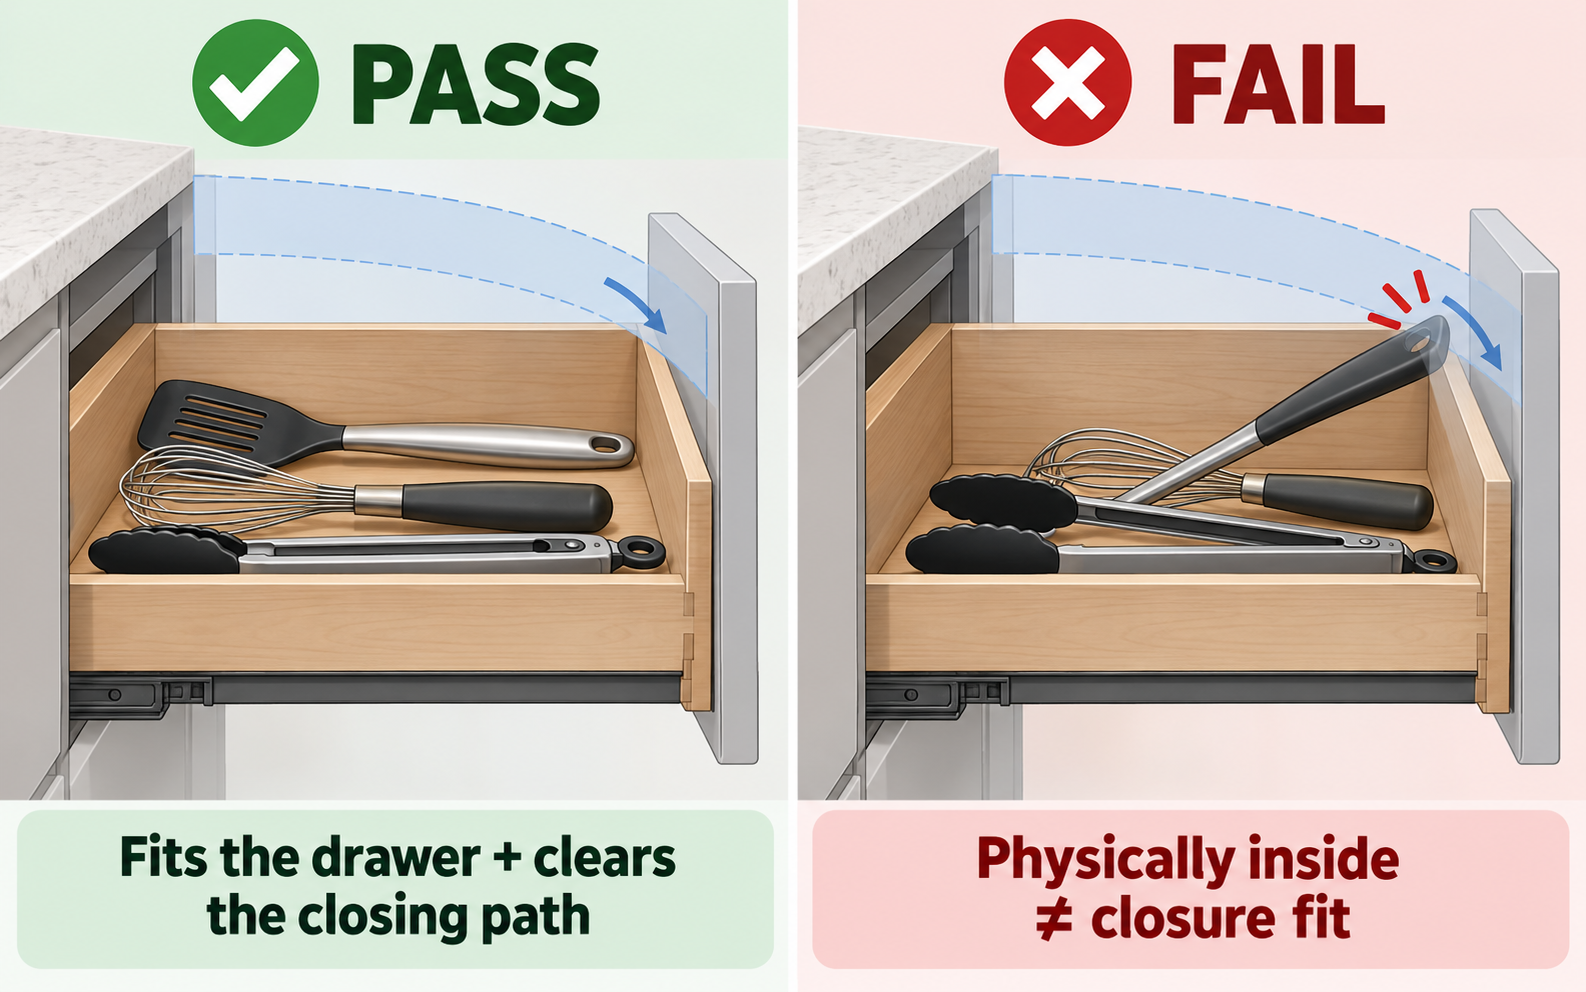
If the loaded drawer does not open and close normally, the layout has not passed.
No organizer is helpful enough to make up for a drawer that has become annoying to operate.
Find the Usable Capacity Limit
Usable capacity is not the maximum number of tools you can squeeze into a drawer.
It is the amount the drawer can hold while still preserving:
- normal closure;
- practical retrieval;
- practical return.
You may reach that limit before the drawer looks visually full.
Watch for:
- tools covering one another;
- multiple items needing to move before one can come out;
- awkward tools being forced into gaps;
- contents shifting enough to affect closure;
- items needing rearrangement before they can be put back.
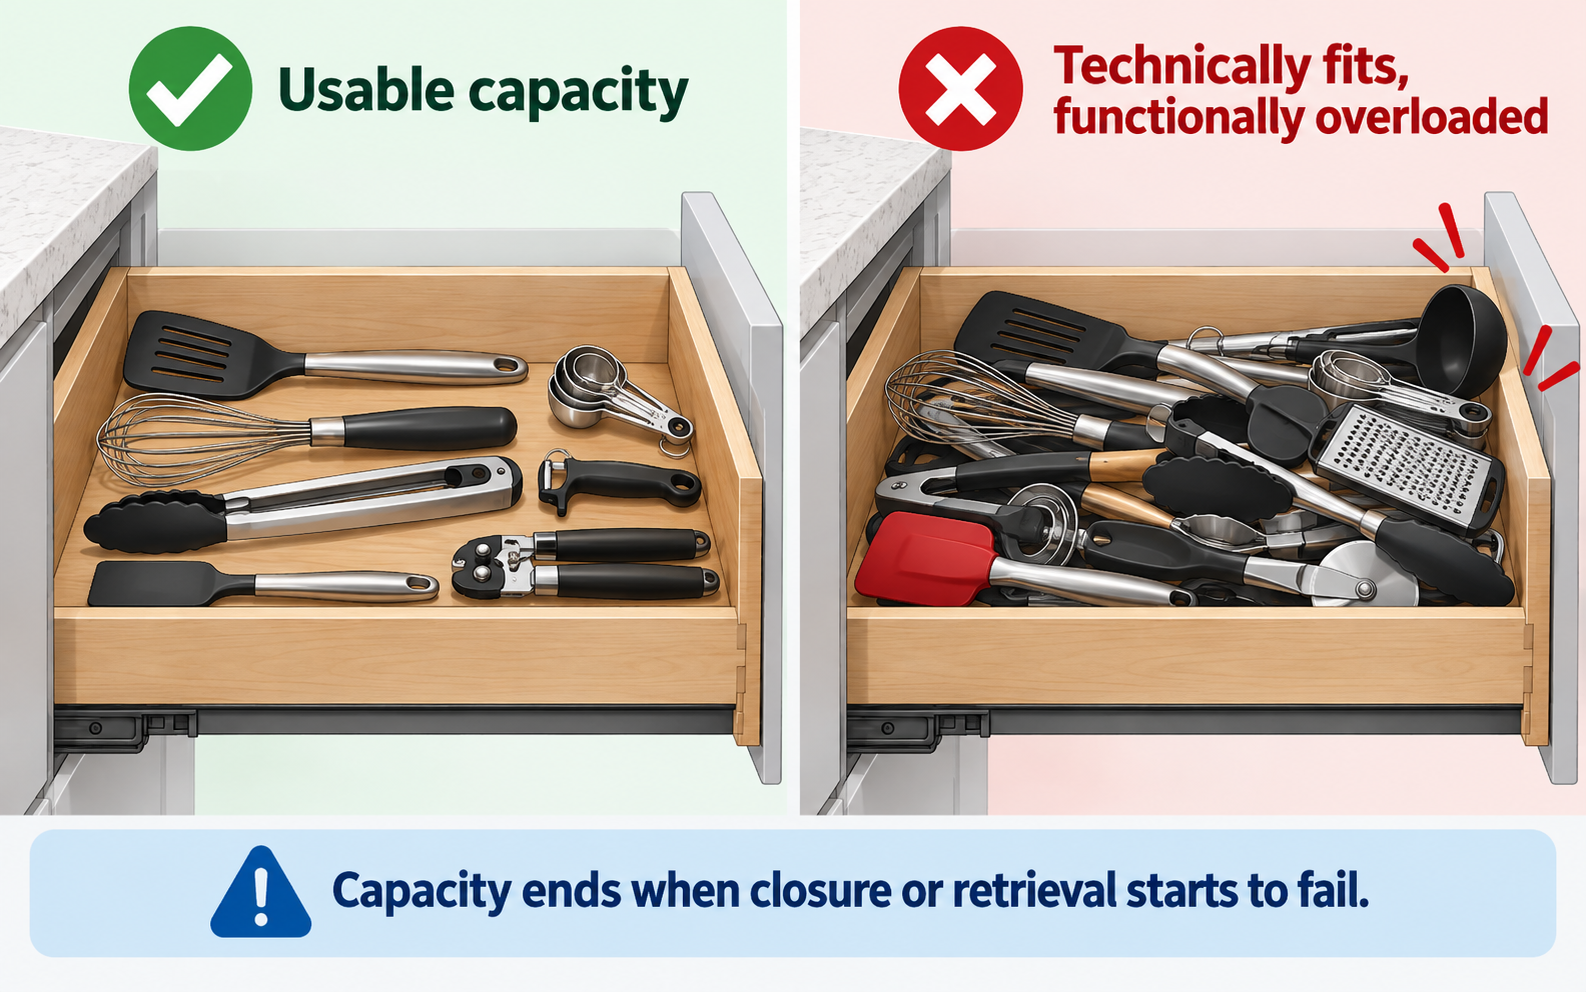
There is no evidence-backed universal rule such as “leave 20% of the drawer empty.”
Sometimes the correct answer is simply to leave part of the drawer open rather than subdividing every inch.
Decide What Belongs in Which Drawer
Once a drawer passes the physical-fit test, decide whether its contents make sense for the way the kitchen is actually used.
The familiar advice to “store cooking tools near the stove” can be useful, but location should not override fit.
A nearby drawer is not automatically the right drawer when:
- the tools jam;
- the drawer is difficult to reach;
- sharp tools are mixed carelessly;
- frequently used items are buried;
- the intended user has to bend, twist, or grip awkwardly.
Use this decision order:
1. Task
What activity uses the tool?
Examples include:
- prep;
- cooking;
- serving;
- cleanup.
2. Fit
Does it fit without compromising normal drawer operation?
3. Frequency
Does its position reflect how often it is used?
4. Retrieval and return
Can it come out and go back without dismantling the arrangement?
5. Accessibility and safety
Does the drawer work for the person using it?
This gives you a decision rule instead of a fixed list of what “belongs” in every drawer.
Stage 2: Will You Use It and Put It Back?
A drawer can pass the physical-fit test and still fail during everyday use.
Stage 2 looks at friction.
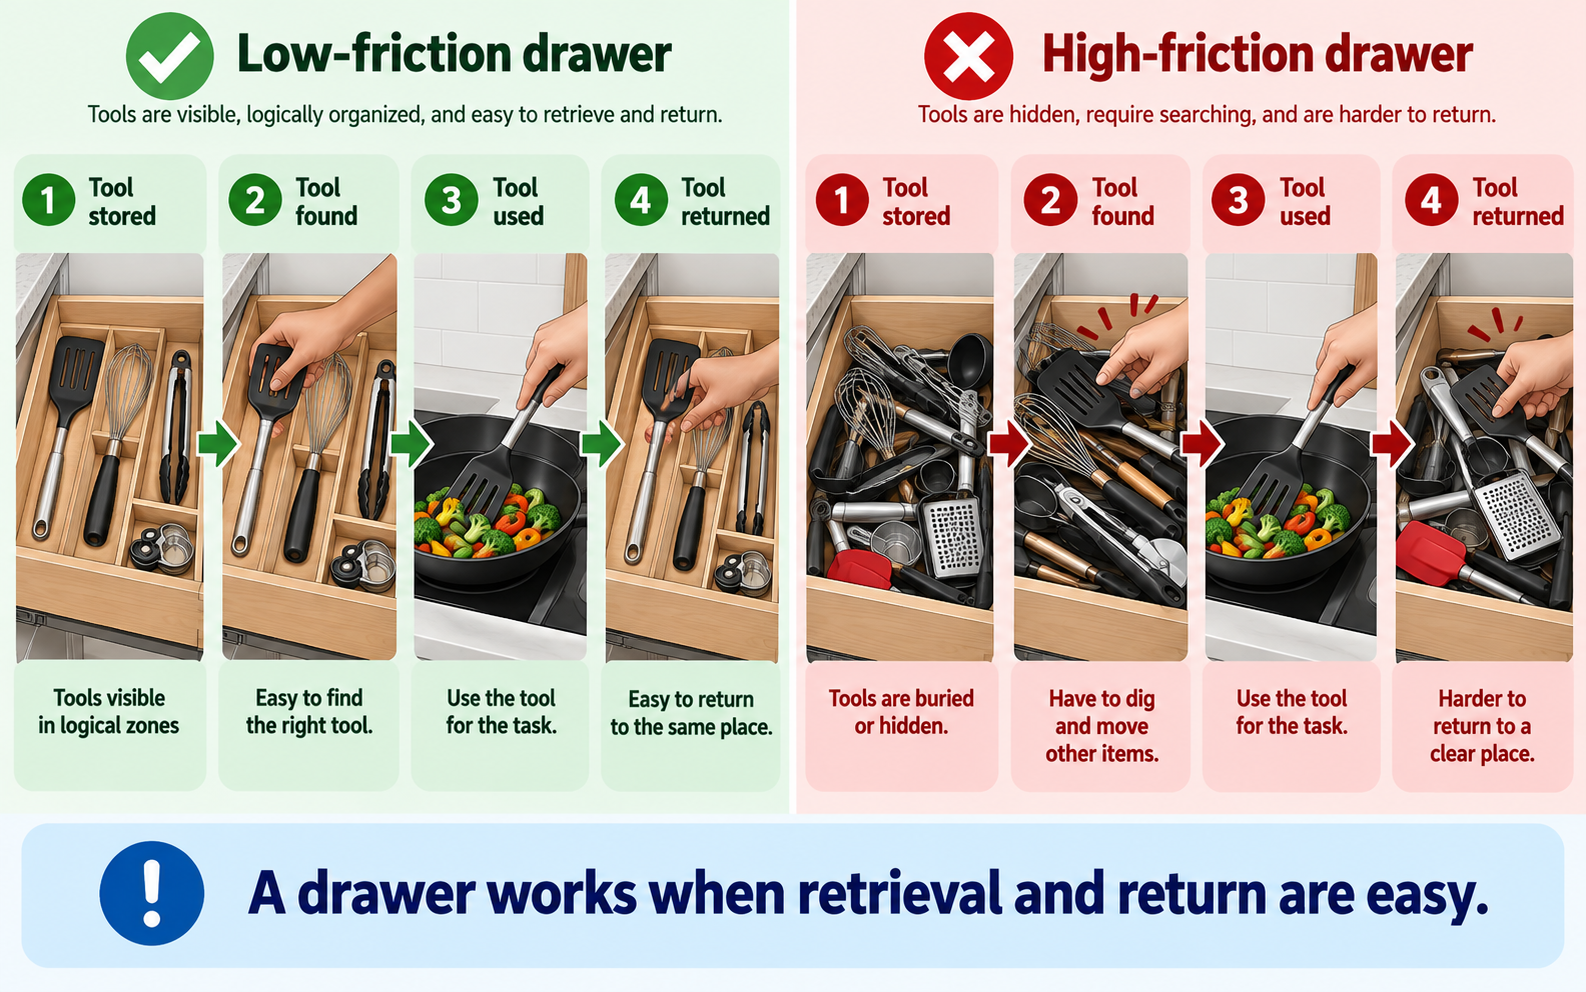
See and Retrieve
Visibility and retrieval are related, but they are not identical.
See: Can you identify the tool you want?
Retrieve: Can you remove it without moving several unrelated items first?
A drawer where everything is technically visible but packed too tightly can still be frustrating.
Also consider how much of the drawer you can actually access. Some drawer hardware provides fuller access to the back than others, so do not assume the entire depth is equally convenient.
If the back portion is difficult to reach, it is usually a poor location for the tools you use most often.
Test Return Effort
Retrieval is only half the test.
Take out a frequently used tool, then put it back.
Ask:
- Does it fall naturally into place?
- Does another item need to move first?
- Must it sit at an exact angle?
- Does the system depend on careful nesting?
- Would someone in a hurry realistically return it correctly?
A layout that is easy to retrieve from but tedious to reset is likely to become messy again.
Putting a tool back is a practical usability test. The layout itself should make return easy, rather than treating it only as a task for the user.
If returning tools requires too much precision, simplify the layout.
Put Tools Near the Task They Serve
Task placement still matters.
Prep tools should be convenient to the area where prep happens. Cooking tools should be reasonably accessible where cooking happens.
But there is no universal evidence-backed distance that makes a drawer “correct.”
Use a simpler question:
Does storing this tool here reduce unnecessary reaching, turning, or walking without creating a worse fit, accessibility, or safety problem?
Task placement comes after fit.
If the nearest drawer is too shallow or too cramped, choose another location rather than forcing the tools into it.
If the real decision is whether a utensil should live permanently on the countertop instead, use the countertop-residency framework.
Check Accessibility
The drawer should work for the person using it.
At the drawer level, consider:
- comfortable reach;
- bending or stooping;
- grip needed to open or retrieve;
- whether narrow compartments demand fine finger control;
- whether one-handed retrieval would make the system easier for the intended user;
- whether bulky or dense contents increase effort unnecessarily.
Do not apply commercial accessibility dimensions as universal rules for private kitchens.
The useful principle is functional:
The organization system should reduce avoidable effort rather than add it.
Accessibility Gain
A layout may improve accessibility when it:
- reduces layers;
- keeps frequently used tools easier to reach;
- requires less grip precision;
- reduces unnecessary bending;
- reduces unnecessary searching or rearranging.
An organizer with many narrow slots can look tidy while making retrieval harder for someone with limited grip or dexterity.
Run a Safety Check
Safety matters even when everything fits.
Sharp tools
Do not leave exposed knife blades loose among general utensils.
If knives are stored in a drawer, use a method that protects the blade and reduces accidental contact.
In homes where young children could access sharp tools, appropriate access control may also be needed.
Before choosing an in-drawer knife organizer, compare its footprint with the drawer’s usable width and depth, confirm the organizer and knife handles stay within usable drawer height for normal closure, and verify that the knives you plan to store suit the organizer’s documented format.
Kitchen
Joseph Joseph DrawerStore Compact Knife Organizer
Designed for the safety problem of loose knife blades stored among everyday utensils. The compact in-drawer format separates knives and keeps blades covered without permanent installation.
Check on Amazon (opens in a new tab)Heavy contents
If a drawer contains unusually heavy tools or dense contents, check the actual drawer or slide manufacturer’s load guidance.
Different drawer systems have different ratings and operating conditions.
There is no universal kitchen-drawer weight limit that should be applied here.
How to Organize Deep Kitchen Drawers for Utensils and Tools
Deep drawers create a different version of the same fit problem.
Extra height can help with larger tools, but it can also create:
- hidden layers;
- tools tipping over;
- poor access to the back;
- smaller items disappearing behind larger ones;
- oversized utensils dominating the drawer.
Deep drawers and large utensils need attention, but their fit problems overlap with the broader drawer-organization problem.
Use these fit-and-function checks for deep utensil drawers rather than treating them as an entirely different problem.
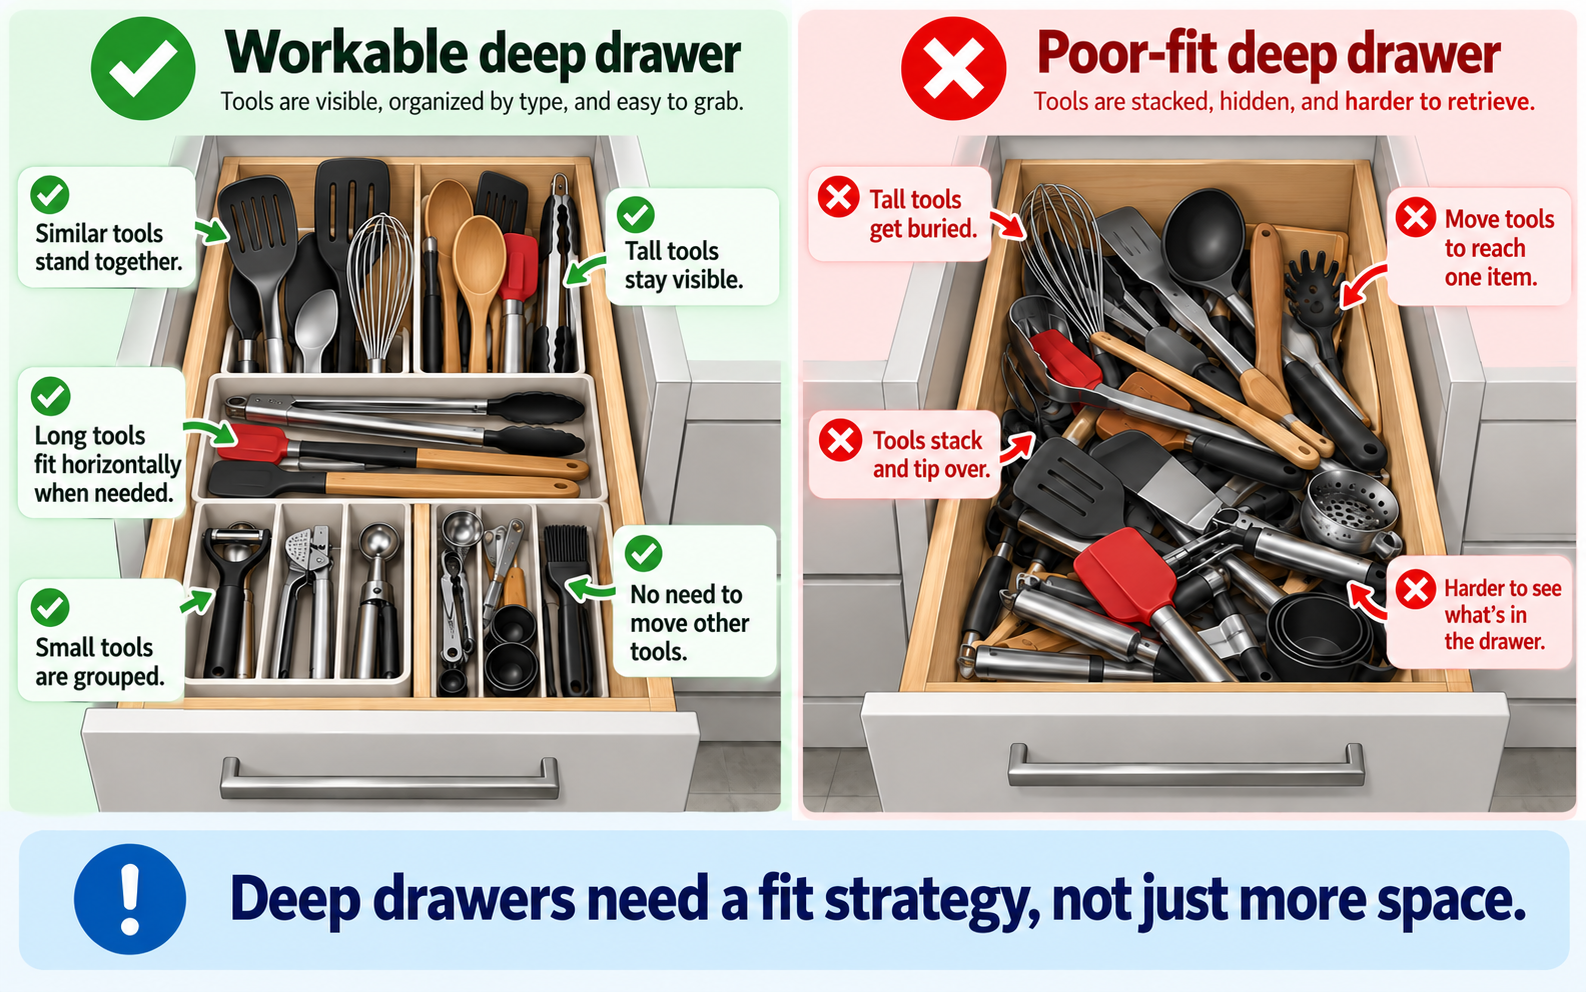
Use vertical space only when retrieval stays simple
A deep drawer does not need to be filled to its full height.
Ask:
- Will tall tools stay stable?
- Will small tools disappear behind them?
- Can the back still be reached?
- Can each item return to its position without knocking over another?
If using vertical compartments creates hidden layers or unstable tools, the extra height is not helping.
Keep the scope to utensils and tools
This section does not cover:
- pots and pans;
- bakeware;
- dish stacks;
- food-storage containers;
- general cookware peg systems.
Those have different storage and load considerations.
When a Drawer Organizer Actually Helps
An organizer is useful when it solves a diagnosed failure.
A divider, tray, or insert may help when:
- small tools continually mix together;
- one bulky tool pushes smaller items around;
- contents slide enough to create tangles;
- sharp items need dedicated separation;
- frequently used items need predictable positions.
Measure first
Before considering any organizer:
- measure the drawer;
- measure the tools that determine the fit;
- identify the failure you are trying to solve;
- compare the organizer to the usable space;
- verify that the loaded drawer will still close.
Kitchen
SpaceAid Bamboo Drawer Dividers with Inserts and Labels
Adjustable dividers are useful when the drawer itself is fine but everything inside it keeps migrating into one pile. This design adds smaller inserts between the main dividers, making it easier to create zones around your actual utensils instead of forcing everything into a fixed tray.
Check on Amazon (opens in a new tab)But organizers also consume usable space.
A tray with five tidy compartments is not automatically an improvement if its frame leaves retained tools with nowhere practical to go.
Kitchen
OXO Good Grips Expandable Utensil Drawer Organizer
Useful when one drawer holds both standard utensils and awkward tools that do not fit neatly into narrow compartments. Its expandable layout combines defined sections with open space instead of forcing every tool into the same slot shape.
Check on Amazon (opens in a new tab)Kitchen
Vtopmart 25 PCS Clear Plastic Drawer Organizers
Best suited to lots of small gadgets and accessories that disappear around larger tools. The different bin sizes create separate homes for compact categories without permanently attaching anything to the drawer.
Check on Amazon (opens in a new tab)No organizer is also a valid answer
If the drawer already has:
- a manageable tool set;
- clear retrieval;
- normal closure;
- easy return;
- no meaningful safety problem,
adding an organizer may solve nothing.
The goal is not maximum subdivision.
The goal is a drawer that works.
If sliding is the remaining problem, measure the usable drawer footprint before trimming a liner to fit, and verify that the liner material is suitable for the drawer finish. Treat surface compatibility as a separate check from the decision to use a liner at all.
Kitchen
GORILLA GRIP powerGRIP Drawer Shelf and Cabinet Liner
For drawers that already have sensible zoning but whose contents slide around, this non-adhesive liner adds grip without introducing rigid compartments or permanent attachment.
Check on Amazon (opens in a new tab)Renter-Safe Drawer Organization
Many in-drawer solutions are easy to reverse, but no-drill does not automatically mean renter-safe.
Classify the installation first.
Freestanding or removable
Usually involves fewer surface concerns, but fit and material compatibility still matter.
Tension-fit
Check the exact product instructions and whether pressure could mark the drawer.
Non-adhesive liner
Check whether the material is suitable for the drawer finish.
Adhesive
Do not assume “removable” means damage-free on every surface.
Follow the exact manufacturer’s surface and removal guidance before describing an adhesive product as renter-safe.
The important distinction is:
Installation method and surface compatibility matter more than the words “no drill.”
What to Skip Even If It Technically Fits
Physical fit is necessary, but it is not enough.
Skip a layout or organizer when:
- the drawer no longer closes normally;
- tools must sit at an exact angle to avoid catching;
- frequently used items become harder to retrieve;
- the back becomes impractical to access;
- several layers must move for one tool;
- the system requires careful rebuilding after every use;
- the organizer consumes more useful space than the problem justifies;
- sharp tools remain exposed;
- installation does not suit the drawer or rental situation;
- the layout adds unnecessary reach, bending, or grip difficulty.
The simplest solution that passes the tests is often better than the most organized-looking one.
Frequently Asked Questions
What is the best way to organize kitchen drawers?
Start with the usable drawer dimensions and the tools that are hardest to fit.
Then test whether the layout preserves normal closure, easy retrieval, easy return, useful task placement, and appropriate accessibility.
Choose an organizer only if it solves a specific failure.
What should go in kitchen drawers?
Store items in a drawer when they:
- physically fit;
- are reasonably located for the task they serve;
- can be retrieved without excessive digging;
- can be returned easily;
- remain safe and accessible.
Do not force every tool in one category into the same drawer if the fit is poor.
How do you organize large kitchen utensils in a drawer?
Measure the longest and bulkiest tools against the drawer’s usable width, depth, and height.
Then check whether they can be stored without blocking closure or burying smaller tools.
If the large items control the layout, give them deliberate space rather than forcing them into compartments built around smaller utensils.
How do you organize deep kitchen drawers?
For utensils and tools, use the extra depth only when it improves fit without creating buried layers.
Check:
- access to the back;
- whether tall tools tip;
- whether small tools disappear behind larger ones;
- whether items are easy to return.
A deep drawer does not have to be filled vertically just because the space exists.
Do I need drawer organizers?
No.
An organizer is useful only when it solves a specific problem such as mixing, sliding, unsafe sharp-tool storage, poor retrieval, or unreliable placement.
If the drawer already closes normally and tools are easy to retrieve and return, open space may be the better solution.
How do you keep kitchen drawers organized?
Make the layout easy to reset.
If putting a tool away requires moving several other items or placing it in one exact position, the system depends on extra effort every time it is used.
Reduce that friction instead of relying only on reminders to put things back.
How should knives be stored in a drawer?
Do not leave exposed blades loose among general utensils.
Use an appropriate drawer-storage method that protects the blade and reduces accidental contact.
Where young children could access the drawer, consider appropriate access control as well.
Measure First, Then Choose the Simplest System That Works
A kitchen drawer does not need to look perfectly divided to be organized.
It needs to:
- fit the tools assigned to it;
- open and close normally;
- make useful items easy to see and retrieve;
- let those items go back without reconstructing the drawer;
- sit in a sensible task location;
- work for the person using it;
- handle sharp or unusually heavy contents appropriately.
Measure the drawer.
Measure the tools that create the hardest fit.
Test closure.
Test retrieval.
Then test how easy it is to put everything back.
Only after those checks should you decide whether the drawer needs a tray, divider, liner, another type of organizer, or nothing at all.
An organizer cannot create a better system if it does not fit the drawer’s real geometry and the way the drawer is actually used.