How to Organize Under the Kitchen Sink in a Small Kitchen
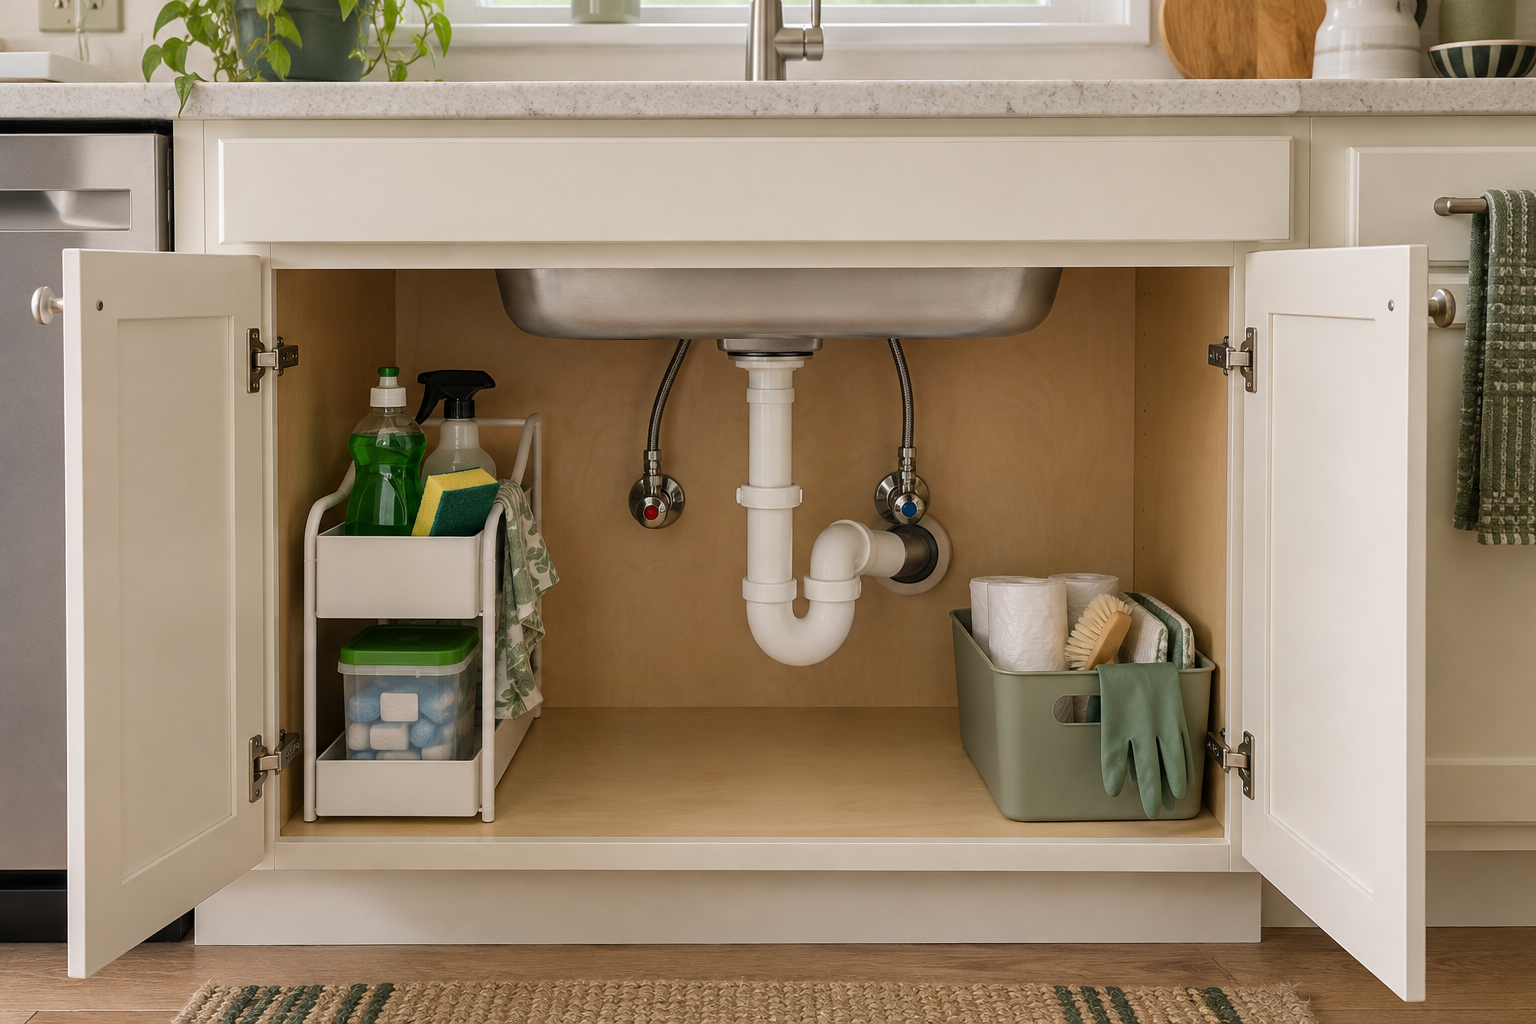
The best way to organize under the kitchen sink is to treat the cabinet as a plumbing-access zone first and a storage cabinet second. Empty it, inspect the space, map the pipes and service points, decide what must stay clear, and measure the usable areas that remain. Only then should you decide whether a pull-out, bin, caddy, turntable, or door organizer actually improves the cabinet.
That order matters in a small kitchen. The cabinet may look roomy when it is empty, but the P-trap, supply lines, shutoff valves, hinges, and possibly a garbage disposal divide it into irregular pockets. Trying to fill every inch can make daily supplies harder to reach and plumbing harder to access.
A better goal is a simple cleaning-and-sink-supply system that fits around the fixed components instead of fighting them.
Affiliate disclosure: This guide contains affiliate links. As an Amazon Associate I earn from qualifying purchases. We recommend products based on problem-solution fit, dimensions, compatibility, and practical usefulness. Read the disclosure.
In This Guide
- Why the Cabinet Under the Sink Is Different
- Empty and Inspect the Cabinet Before You Organize
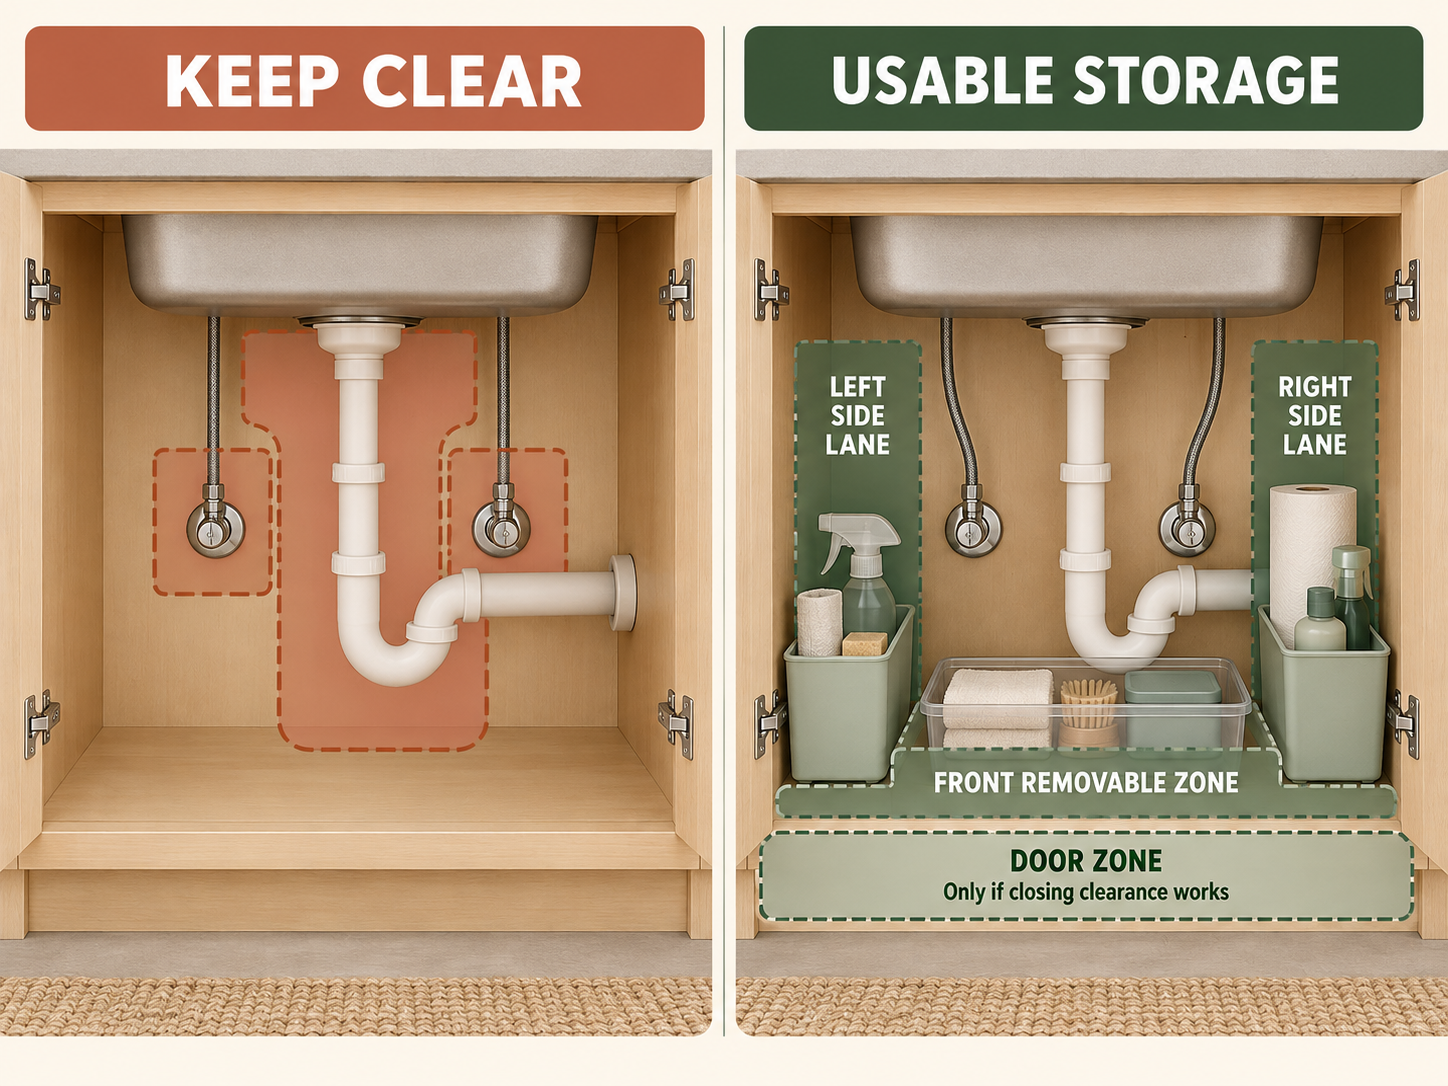
- Map the Plumbing and Define the Keep-Clear Zone
- Measure the Space You Can Actually Use
- Decide What Actually Belongs Under the Sink
- Build Simple Zones Around the Fixed Obstacles
- Match the Organizer to the Shape of the Empty Space
- Renter-Friendly Under-Sink Organization Without Drilling
- Common Under-Sink Organization Mistakes
Why the Cabinet Under the Sink Is Different
A sink-base cabinet is not a normal empty box. It is storage wrapped around working plumbing.
The drain and P-trap interrupt the center or rear of the cabinet. Supply lines and shutoff valves may occupy one or both back corners. A garbage disposal, water filter, hoses, electrical components, or other equipment can reduce the usable footprint further. Face frames and hinges can also make the cabinet opening narrower than the interior cavity.
That means the cabinet’s theoretical volume is not the same as convenient storage. A large organizer may technically fit somewhere inside while still blocking a valve, colliding with a pipe, catching on a hinge, or refusing to pass through the door opening.
For the rest of your cabinets, broader zoning and access strategies belong in our guide to organizing kitchen cabinets in a small kitchen.
Under the sink, however, plumbing access comes first.
Empty and Inspect the Cabinet Before You Organize
Removing everything is useful here for a reason beyond decluttering. You need to see the true shape of the space before deciding where storage can go.
Remove everything and edit obvious clutter
Take out bottles, bags, sponges, tools, empty containers, and anything that migrated into the cabinet simply because there was nowhere else to put it.
Discard empty packaging and worn-out supplies as appropriate. Move duplicate backstock and unrelated household items elsewhere if they are crowding the cabinet. Keep only items that have a practical reason to live near the sink.
Do not buy containers yet. At this stage, an empty cabinet gives you information that an organizer catalog cannot.
Check for active moisture or plumbing problems
With the cabinet empty, look at the base and the visible plumbing area. Notice obvious drips, wet spots, staining, swelling, or damp areas.
If you find active water, stop the organization project and address the source before installing storage. This is not the place to hide a problem under a liner or behind a row of bins. Visual signs alone do not identify the cause, so this article does not attempt to diagnose plumbing failures, mold, structural damage, or water damage.
The goal is simpler: do not organize over an active problem.
Check product labels before returning cleaners
If you plan to keep cleaning products under the sink, read their labels before deciding that this cabinet is the right location.
The American Cleaning Institute advises following label directions, keeping products in their original labeled containers, closing them properly, and never mixing cleaning products. US EPA and American Academy of Pediatrics guidance also emphasizes storing hazardous household products where children cannot reach them; pets and other household circumstances may affect the safest location as well.
Under-sink storage is therefore not automatically appropriate for every cleaner or every household. Follow the product label and use another location when the cabinet is not a suitable storage area.
Map the Plumbing and Define the Keep-Clear Zone
Before measuring for storage, identify what the cabinet must continue to accommodate.
You are not calculating a universal code clearance. You are creating a practical map of fixed plumbing and service points so new storage does not sit directly in the way.
P-trap and drain path
Locate the drain assembly and the curved trap beneath the sink. Plumbing traps use a water seal to block sewer gas from entering the occupied space, according to IAPMO's plumbing-code guidance.
Treat this as functioning plumbing, not as spare support structure. Do not modify, loosen, reposition, or hang storage from the plumbing for the sake of fitting an organizer.
Instead, trace its footprint and note how far it projects into the cabinet.
Supply lines and shutoff valves
Find the visible water-supply lines and fixture shutoff valves. Do not place a fixed organizer where it prevents practical access to them.
The 2021 International Plumbing Code, a model code whose local adoption varies by jurisdiction, states that access must be provided to full-open and shutoff valves. That supports a simple organization principle: keep the visible fixture shutoffs reachable rather than burying them behind permanent storage.
This is an access principle, not local code advice. Your own jurisdiction and plumbing configuration may differ.
Garbage disposal or other equipment, if present
A disposal can occupy a large part of the upper or central cabinet and includes plumbing and electrical connections. Manufacturer instructions may also require access for model-specific service or troubleshooting.
InSinkErator's official installation material, for example, includes plumbing/electrical connection steps and leak testing. Its support material shows that service details vary by unit.
If your sink has a disposal, filter, pump, or other equipment, treat it as a fixed component and check the instructions for your specific model. Do not design storage that assumes every disposal has the same dimensions, reset location, wiring, or service procedure.
Hinges, face frame, outlets, hoses, and door movement
Plumbing is not the only obstacle. Open both cabinet doors and note the hinges, face frame, center stile if present, hoses, cords, outlets, and anything mounted to the cabinet wall.
Also watch how the doors move. A basket on the inside of a door may clear the pipes when the door is open but hit a shelf, bottle, or plumbing component when it closes.
The useful question is not “Where is there empty air?” It is “Which areas can hold storage without interfering with normal access and movement?”
Measure the Space You Can Actually Use
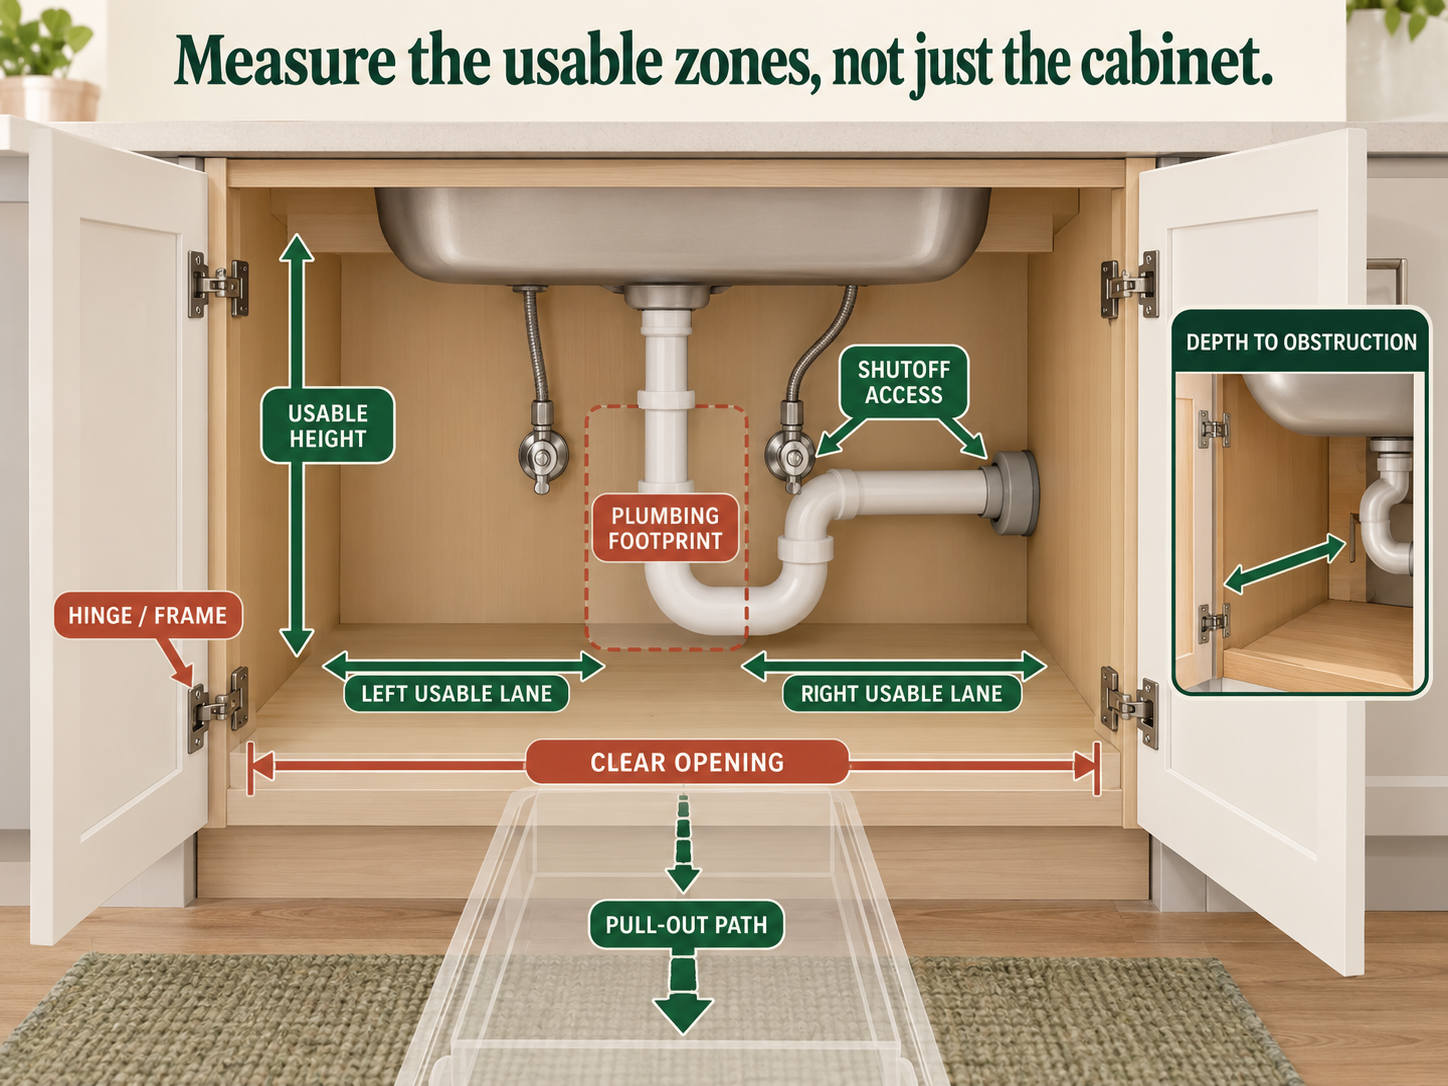
Once the plumbing map is clear, measure the cabinet as a collection of usable zones rather than one large rectangle.
Record:
- the clear cabinet-door opening width
- interior depth to the first rear obstruction
- usable floor width to the left of the plumbing
- usable floor width to the right of the plumbing
- clear vertical height in each usable zone
- the location and footprint of the P-trap and disposal, if present
- the area needed to keep shutoff valves accessible
- hinge or face-frame intrusion
- the withdrawal path for any pull-out
- the tallest or widest item the organizer would need to hold
Measure the opening separately from the interior
An organizer can fit inside the cavity and still be impossible to insert through the cabinet opening. Face frames, center stiles, hinges, and door hardware may reduce the clear entrance.
Measure the narrowest opening the organizer has to pass through, then compare that with the organizer’s full external dimensions later during product research.
Measure each side of the plumbing as its own storage zone
Many sink cabinets are asymmetric. One side may offer a tall, narrow lane while the other has more floor width but less height because of a disposal or hose.
Measure those areas separately. A pair of smaller solutions can be more useful than one large organizer designed for a tidy rectangular cabinet that does not exist in your kitchen.
Test the travel path for pull-outs and door storage
Static fit is only half the problem. A pull-out needs a clear route from its stored position through the cabinet opening. Door storage needs enough room to swing closed without hitting pipes, shelves, or items inside.
Before buying anything, mimic the proposed footprint with a box, tray, or piece of cardboard if that helps you see the path. It is a cheap way to discover that a technically “fitting” organizer would be annoying in daily use.
Decide What Actually Belongs Under the Sink
Reducing the number of items is usually more useful than squeezing in another tier.
Good candidates may include daily dishwashing or sink-care essentials, frequently used cleaning supplies when their labels and your household circumstances support that location, trash bags or small cleanup tools, and one portable cleaning caddy if several supplies travel together.
Move bulky duplicate stock and unrelated items elsewhere. Prime under-sink space is expensive because the plumbing already consumes so much of it; backups do not need the easiest-to-reach positions.
If cleaning products or pesticides are stored under the sink, keep food out of that storage zone. EPA guidance advises separating household chemicals from food. If your small kitchen needs a better place for pantry food or backstock, use a dedicated food-storage system instead; see our guide to organizing a small kitchen without a pantry.
Do not create a universal list of what “belongs” under every sink. Product labels, plumbing layouts, children, pets, and household routines differ. The cabinet should support your sink and cleaning tasks without compromising access.
Build Simple Zones Around the Fixed Obstacles
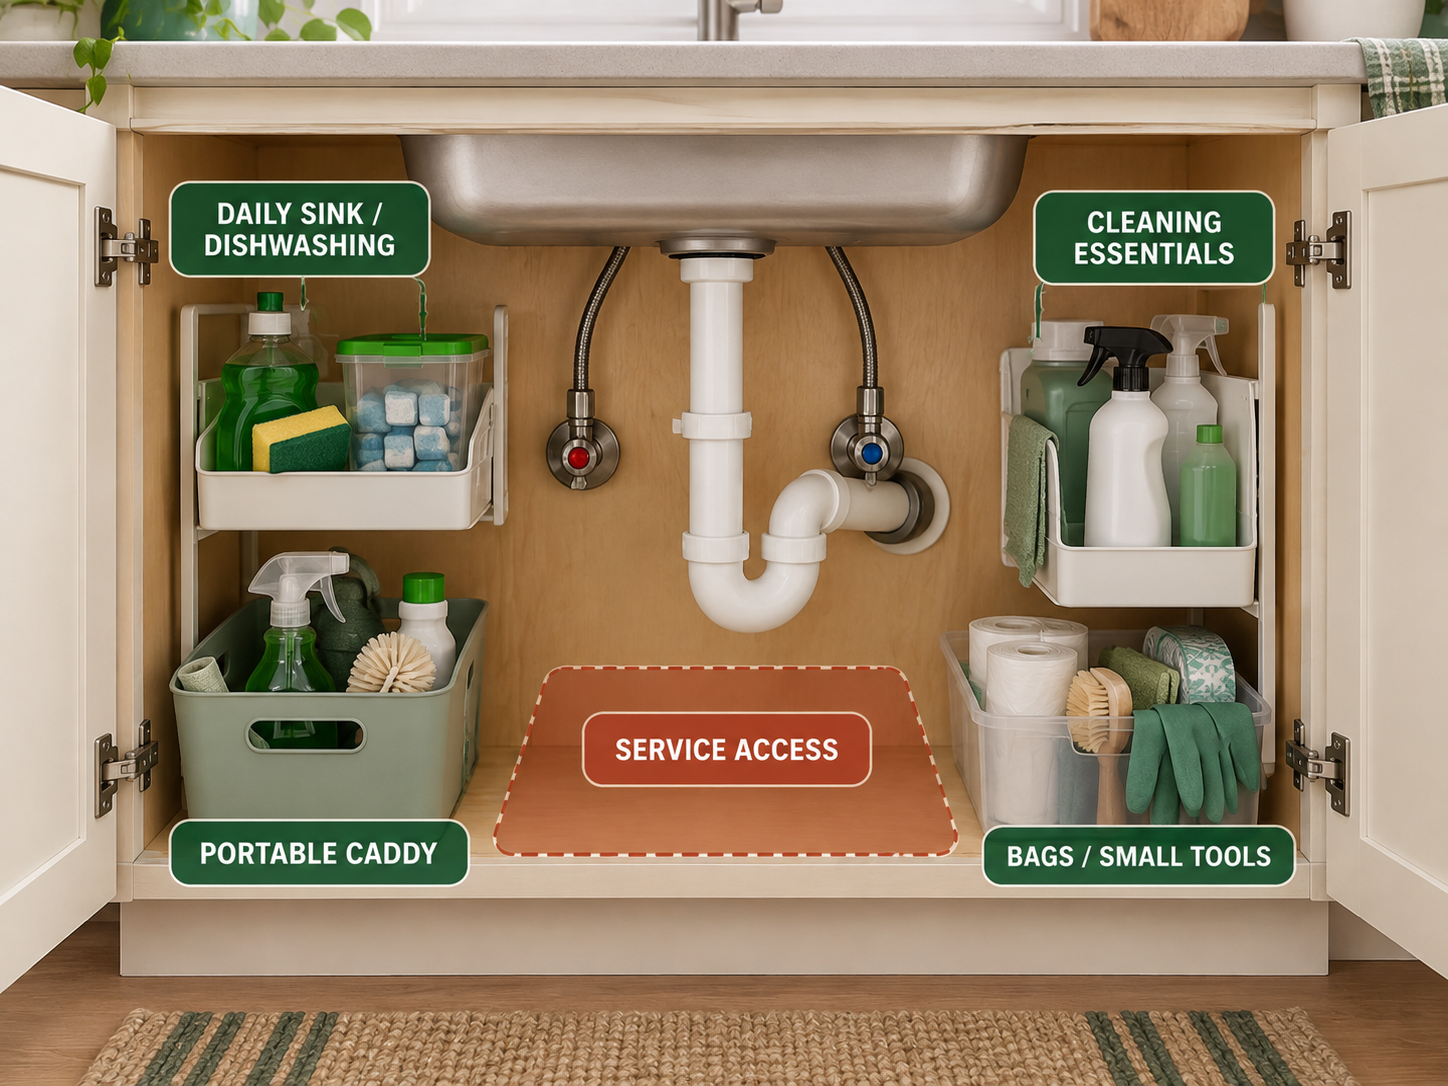
Once you know what is staying, group it by task rather than by bottle shape or matching container.
Daily sink and dishwashing zone
Keep the few items used at the sink most often in the easiest clear area. The point is fast retrieval and equally easy return.
If you use the same sponge, dish soap, dishwasher supply, or sink-care item every day, it should not require unloading three backup bottles to reach it.
Cleaning zone
Group compatible cleaning supplies that are appropriately stored in this cabinet according to their labels. Keep containers upright and in their original labeled packaging.
Avoid building a tall wall of products that hides the back of the cabinet or makes the plumbing impossible to see. A contained group should simplify access, not conceal the cabinet.
Bags and small cleanup tools
Trash bags, gloves, brushes, or small tools can occupy a shallow side area when they do not interfere with plumbing or door movement.
Keep this category edited. The under-sink cabinet should not become the retirement home for every brush and plastic bag in the household.
Portable caddy or grab-and-go zone
If several cleaning products move with you to another room, one handled caddy can keep them together and make the entire group removable when plumbing access is needed.
That portability is often more useful than adding fixed shelves around an irregular layout.
Match the Organizer to the Shape of the Empty Space
Only after the cabinet is mapped, measured, and edited should you compare organizer types.
The strongest choice is not the organizer with the most shelves. It is the one that solves a specific access problem without creating a new collision.
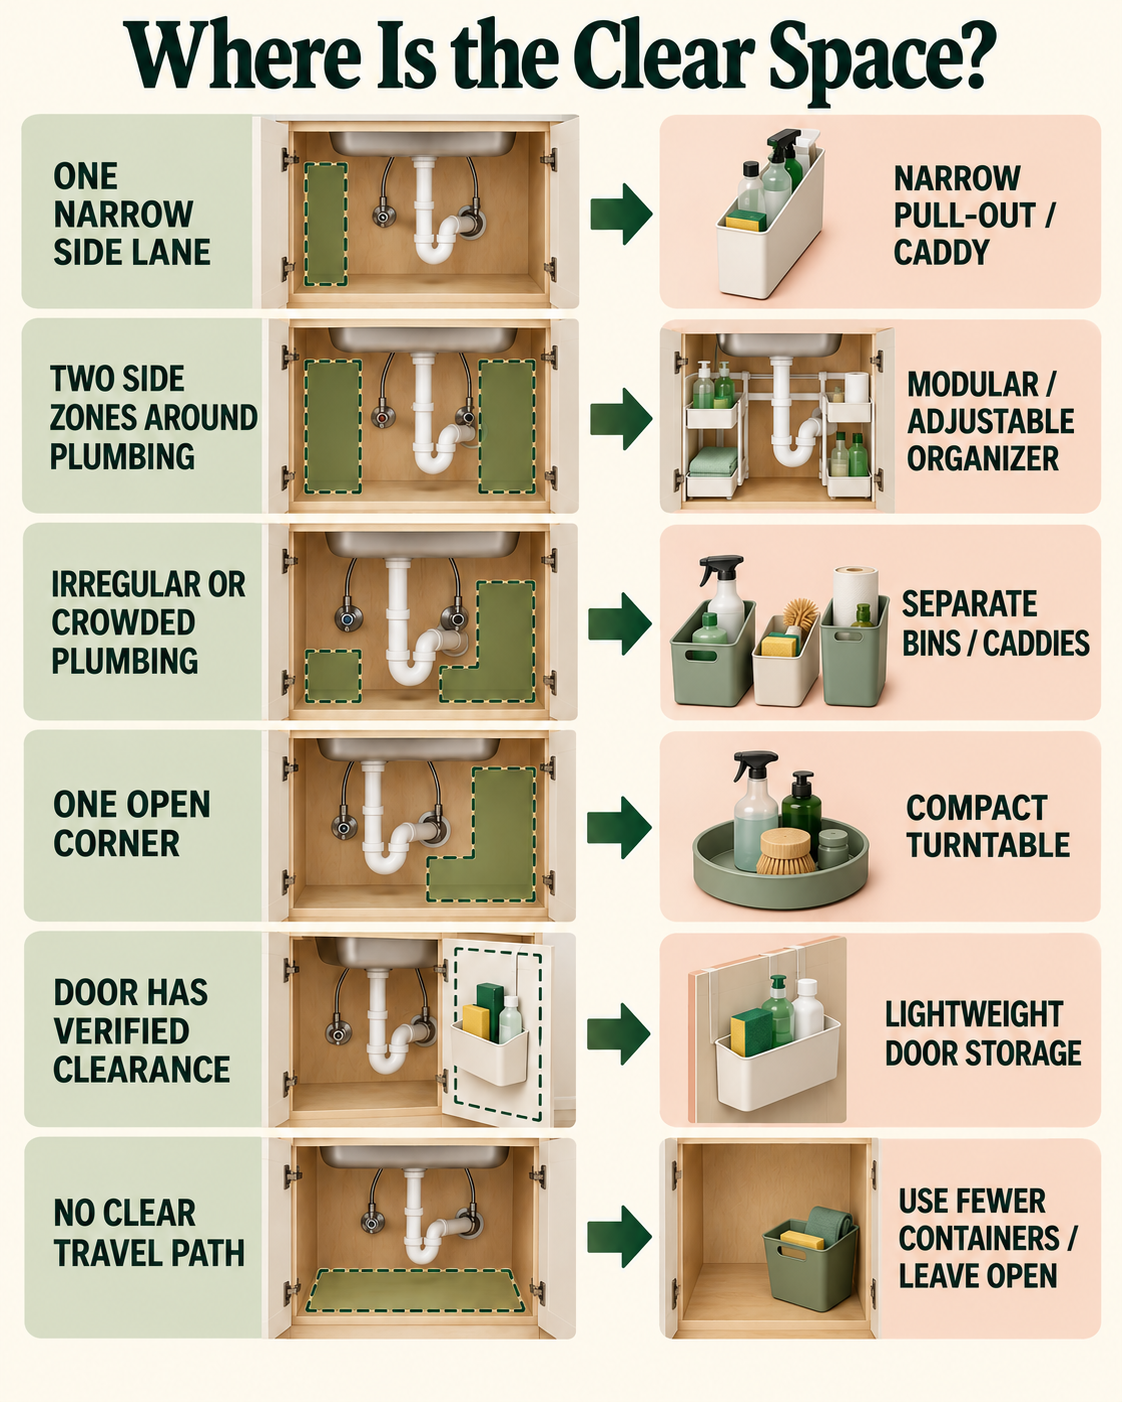
Narrow pull-out or caddy
Kitchen
REALINN Under Sink Organizer, L-Shaped 2-Tier Pull-Out
The L-shaped upper section leaves one side more open around plumbing, while the lower basket pulls forward for supplies stored deeper in the cabinet. The current listing allows the narrow upper basket to sit on either the left or right, so the layout can follow the actual pipe position instead of assuming the center of the cabinet is usable.
Check on Amazon (opens in a new tab)Kitchen
YouCopia RollOut Under Sink Caddy
Under-sink storage usually has plenty of theoretical space and very little convenient space. A narrow rollout caddy can make bottles easier to reach while working around plumbing instead of forcing everything into one deep pile.
Check on Amazon (opens in a new tab)Adjustable or modular around-pipe organizer
Separate handled bins or caddies
Compact turntable
Kitchen
Copco Basics 12-Inch Non-Skid Lazy Susan
A turntable does not necessarily create more cabinet volume, but it can turn unreachable back-row storage into usable storage. It is strongest when access, rather than total capacity, is the problem.
Check on Amazon (opens in a new tab)Cabinet-door storage
Leave the space open when that works better
Sometimes the best storage decision is to add nothing.
If every shelf, drawer, or basket would reduce valve access, collide with the plumbing, or force daily supplies into an awkward path, keep that area open. Deliberate empty space is not wasted when it preserves function.
Renter-Friendly Under-Sink Organization Without Drilling
Renters can apply the same plumbing-first system without turning A05 into another list of rental hacks.
Start with freestanding and removable options: handled bins, caddies, turntables, or organizer frames that do not require cabinet modification. These are easier to test, move, and remove when plumbing needs access.
Over-door, adhesive, and tension-mounted solutions require more checking. Verify the exact product’s mounting method, surface requirements, clearance, and removal instructions before treating it as suitable for a rental. “No drill” does not guarantee that a finish will remain unchanged.
For broader help choosing removable storage throughout a rental kitchen, see our renter-friendly small kitchen storage ideas.
Common Under-Sink Organization Mistakes
Buying before measuring. An organizer designed for a generic sink cabinet does not know where your P-trap, valves, hinges, or disposal sit.
Measuring only the total cabinet width. The number that matters may be a narrow side lane, the clear door opening, or the height below one pipe rather than the overall width.
Blocking shutoff or service access. Storage should be movable enough that plumbing and equipment remain reachable.
Choosing drawers that collide with fixed components. A pull-out must clear the plumbing through its entire travel path, not just while parked.
Packing the cabinet wall to wall. Maximum density can reduce visibility and make every retrieval more difficult.
Hiding active water or dampness behind storage. Address the source before building an organization system around it.
Decanting cleaners into unlabeled decorative containers. Keep cleaning products in their original labeled containers and follow their storage directions.
Keeping excessive backstock in prime access space. Move duplicates elsewhere so the under-sink cabinet can serve the tasks that actually happen at the sink.
A Quick Under-Sink Reset
This cabinet does not need an elaborate maintenance ritual. A brief regular check is enough to keep the system from slowly turning back into a catch-all.
Return stray items, remove empty containers, wipe ordinary spills according to the relevant product and surface instructions, and bring daily-use supplies forward. Check that plumbing and shutoff access remains clear and move growing duplicate stock elsewhere.
The useful test is simple: can you reach what you use without moving unrelated items, and can you still see and access the fixed plumbing components?
For broader whole-kitchen systems beyond this cabinet, see our small kitchen organization ideas.
Frequently Asked Questions
What is the best way to organize under the kitchen sink?
Start with the plumbing, not the organizers. Empty and inspect the cabinet, map fixed components and access points, measure the remaining usable zones, keep only relevant sink and cleaning supplies, then choose removable storage that fits those zones. Leave some space open when an organizer would reduce access.
How do you organize under the sink around pipes?
Treat each clear area beside the plumbing as its own storage zone. Measure the left and right side separately, note the height and depth around the P-trap or disposal, and keep shutoff valves accessible. Smaller bins or a narrow pull-out may work better than one full-width organizer.
What measurements matter before buying an under-sink organizer?
Measure the clear cabinet opening, interior depth, usable left and right floor zones, vertical height, P-trap or disposal footprint, hinge intrusion, valve-access area, and the path a pull-out or door organizer must travel. Also measure the bottles or supplies the organizer needs to hold.
What should I store under the kitchen sink?
Store only items that make sense near the sink and are appropriate for the location. That may include daily dishwashing supplies, certain cleaning products according to their labels and your household circumstances, bags, small cleanup tools, or a portable caddy. Move unrelated items and excess backstock elsewhere.
Can cleaning products be stored under the kitchen sink?
It depends on the product label and your household. Keep cleaners in their original labeled containers, follow storage instructions, never mix cleaning products, and consider whether children or pets can access the cabinet. For some households or products, another storage location is more appropriate.
How do you organize under the kitchen sink in a rental?
Use the same plumbing-first measurements, then favor freestanding or removable storage that fits without cabinet modification. Verify any over-door, tension, or adhesive system against the product’s instructions, the cabinet surface, and the available clearance. Do not assume a removable product is automatically damage-free.
Is a pull-out organizer better than bins under the sink?
Neither is automatically better. A pull-out is useful when there is a clear side lane and an unobstructed travel path. Separate bins may work better around irregular or crowded plumbing because they can be sized and removed independently. Choose based on the shape of your usable space.
How often should I reset the cabinet under the sink?
There is no required schedule. Check it often enough to remove empty containers, return stray items, control duplicate stock, and confirm that plumbing access remains clear. A brief check during regular kitchen cleaning is usually more sustainable than a complicated routine.
Final Takeaway
Learning how to organize under the kitchen sink is less about buying more storage and more about respecting the shape and function of the cabinet you already have.
Inspect first. Map the plumbing. Define what must stay clear. Measure the actual usable zones. Keep only what belongs near the sink. Then choose the smallest organizer or removable container that solves a real access problem.
A well-organized under-sink cabinet does not have to use every inch. It should make everyday supplies easier to reach while leaving the plumbing, valves, and service areas practical to access.